 Austin has a pretty large collection of Transformers. They are by far his favorite. And if you ever ask him about them, be prepared for at least a thirty minute explanation or story. He does make it entertaining though, he's a pretty animated little guy.
Anyway... He transforms them so much, that the hinges on a lot of them are going bad, and pieces were disappearing. Not to mention a little girl kept sneaking into his room when he wasn't looking. She had a tendency to run off with parts to his "formers". So, our solution was to create two bags for his transformer toys, one for the autobots and one for the decepticons. I used two of my husband's old white t-shirts (he has tons!) - one shirt for each bag, and labeled each drawstring hammock with either the autobot symbol or the decepticon symbol. I used freezer paper to create the symbols. If you are not familiar with the freezer paper method, or need a quick reminder on how to do it, check out my old tutorial here.
These have worked out great so far! I have them hung low enough for Austin to reach in and grab what he needs, but also high enough so his little sister can't run off with an autobot leg or head, lol.
So, on to the tutorial!
What you need:
Old T-Shirt - any size, and regular fit
Sewing Machine
Scissors
Thread
(The following are optional for the stencil)
Freezer Paper
Acrylic Paint or Fabric Paint
Sponge Brush
Exacto Knife
 You start with a plain T-Shirt
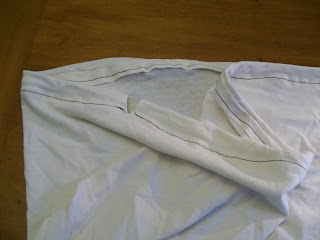
 Cut off the top, arm pit to arm pit. Cut apart the top piece, in the chest area, around the raglan seams so it looks like the photo above.
 Take your largest pieces and pin along the cut edge (leaving the original hemmed bottom alone. Sew together to form a large sack.
Take one edge and lay it out flat to form a triangle.

Determine how wide you want the bottom of your bag, and then sew across to form a triangle. I went in about 2.5" from the tip. Repeat on the opposite side.

Take your scissors and trim off the triangle tip so it looks like the photo above. Do the same on the other side. You should now have a sack with a flat bottom.
 Take the hemmed edge of the T-Shirt and cut a small slit on each side of the bag, about 2 inches down.
Fold over and pin down one side.
 Sew together, making sure to leave a space large enough to pull threw the ties. Repeat on the other side.
 This is what it should look like. Don't worry about sewing the slits. The nice thing about T-Shirts is that they don't really fray or unravel.
 This is what the bottom of the bag should look like.
 Take the piece of shirt that you cut earlier from the top portion, and cut off three half inch to inch strips along the length of the shirt piece.
 Tie them together to form a really long strip, but not a circle, you need to thread this. If you want cleaner look to your drawstring hammock, you can also use yarn or ribbon. I wanted this to have more of a boyish look though.
 Attach a safety pin to one end and thread it threw both sides. Tie the ends together to form one large loop, and then pull a bit from each end out of each slit.


love love love this...i may have to steal (or borrow) this idea!!
ReplyDeletexo
monica
Thank you Monica! Please do steal the idea :) If you blog about it though, please link back - thanks so much ;)
ReplyDelete