Thursday, December 30

Pirate Eye Patch Tutorial

My oldest is rather obsessed with pirates lately, and the fact that now he knows I can "make lots of cool things" with my sewing machine, he put in a request. Thankfully this request was really simple, fast, and the end result was immediately appreciated - which always makes me feel good too.

This is such an easy project, and can be completed with scrap material and elastic. Thankfully I always save the random sizes of elastic that get snipped away for waistbands and what not, so I had everything on hand.

Here's how to make one for your little pirate. I should add, another request has been put in for a pink pirate eye patch - I think I can manage that ;)
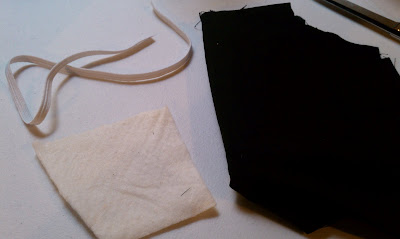
Gather your supplies. I used a scrap of thin elastic - to get the right length, I put it around my son's head where the eye patch would be and subtracted an inch. I cut out a 3x3ish square (you can use any size you want really, just make sure it's big enough to cover the eye) of scrap batting (you could also use felt, an old towel, fleece or any other thick and soft fabric). I also cut out two 3x3ish pieces of black quilting weight fabric. You will also need coordinating thread, scissors and a machine (you could do this by hand quickly too I'm sure).

These directions assume a 1/4" seam allowance.

Cut out the desired shape from your batting piece. I just rounded out the bottom of my uneven square shape.

Place that on the black fabric, trace, and cut out so that all three pieces are identical


You should have something like the photo above.

Place the right sides of the black fabric facing each other, and put the batting on top. Take your elastic and make a loose knot in the middle to keep it together (you will be undoing this later, so keep it loose), this will prevent accidentally sewing the elastic to the seams in the wrong place.


Position the elastic ends half an inch down from the top corners, and have them sandwiched inside of the two black pieces, place the batting on top and pin in place. You can't see where I put the elastic ends in the photo, but they were placed just behind each front pin in the photo (closer to the bottom of the eye patch). Again, make sure that your elastic is away from the edges.


Sew around the edges, starting at the top right side, and work your way round to the top left side. Leave a gap large enough to turn the patch right side out.

Snip your corners and edges.

Turn right side out, and top stitch around the entire eye patch, closing the gap at the top in the process.

That's it!


This patch has become a regular addition to my son's wardrobe. Too bad they don't allow pirates at school. Although then it probably would never come off.
Take care!
-Lisa :)


Wednesday, December 29

Experimenting with "Chemical" Reactions - Child Project

One of my son's Christmas presents was a science kit geared toward younger children (4+). All of the experiments involve things you typically can find in your own kitchen and involve mixing liquids and powders and determining if the liquid is an acidic or not. Both of my children loved this quick little project - and could have done it all day if I were willing to keep dumping baking soda into cups. This does require adult supervision, so please don't walk away from the table if you choose to try this.

What you need:

A plate to catch spills
Cups for mixing and holding liquid
Baking Soda
Liquids of choice - make sure one is an acid (we used milk, vinegar, and water)
1 tsp
1 tbsp
Stir stick (optional)
Food coloring (optional)

Put a tsp of baking soda into a cup (add a couple drops of food coloring if you wish)

Let your child choose a liquid to add to the baking soda, and have them guess what the reaction will. Explain how to tell if the liquid is an acid or not.

The photo above is the result of adding water first, then the vinegar.

Here is an example of straight vinegar.

My self-proclaimed scientist concocted this one all on his own (by adding milk and food coloring to the vinegar).
As simple as this may seem, by children we absolutely amazed by it. Give it a try and see what combinations you and your children come up with.
Take care!
-Lisa


Tuesday, December 28

Handmade Holiday Gifts

As much as I love Christmas, and everything it brings along the way, I also love the days after. The slowing down, and easing back into the rhythm of our days is comforting.

Annnnd, now that the gift giving has ended, I can finally share some of the handmade gifted items of the year - yay! I'm a little frustrated with myself for not taking pictures of everything before wrapping. I gave some things away that I can't share with you all because I failed to take a photo first. I'm sure these photos will be enough :)


I'd like to introduce you to Hannah's little Gnome family. Yes, unfortunately, the nature baby swaddled in maroon has been shunned to sleep with the pigs. Oh Hannah...

And what is a fairy princess with out a wand?

Here's the little stinker in action - constant action. I couldn't get a good shot of her momma-made pixie hat and scarf. Both are my design, I'm working on writing up a pattern to put in my online shop once it opens (more on that later!)

Here's a slightly better shot of her hat...

And, well, momma needs to match right? Right. But, note to self - this should happen AFTER the holiday so I'm not so rushed.

Some super cute (I think anyway) ear warmers. You can find the free pattern here.

We made lots and lots of treats. Here is one of many gift bags filled with Country Oatmeal Cookie mix in a jar, and gingerbread men and dragon flies - yes, dragon flies :)

And of course the holiday outfits I made for the kids. I'm pretty sure I bombarded you with enough of those photos.

I hope you are enjoying your days just as much as we are.
Take care!
-Lisa


Monday, December 27

Ordinary Monday

**A new Monday ritual. A single photo of something ordinary and small in our days, but still filled with happiness and moments worth remembering**


Wishing you a warm and wonderful last week in this year,
Lisa

Friday, December 24

Happy Holidays!

It's Christmas Eve, and we're all filled with excitement and anticipation for the coming hours. I wanted to take a moment here to wish all of you a safe and wonderful Holiday. I will be back on Monday - I can't wait to share some of the homemade crafts and goodies we made this year!
From our family to yours, Happy Holiday!!
- The Palubicki's

Wednesday, December 22

Holiday Cookie Round Up


I have been baking uncontrollably for the last week or so - seriously. I just can't seem to stop myself. Though I don't think my friends and family will protest - we have been bombarding them with treats.

Because a lot of you have been asking about the recipes I use, I thought it would be fun to do our Holiday Cookie/Treat recipe list here.
This list does not include all of the items I make each year, but definitely a lot of our favorites.
1) Healthy Coconut Oil Fudge (pictured above)

2) Chewy Ginger Snaps (pictured above)

3) Triple Layer Peppermint Bark

4) Eggnog Truffles

5) Cinnamon Biscotti Cookies (pictured above) - this was taken from a December issue of Better Homes and Gardens years ago, and I don't know if legally I can reprint it...

5) Homemade Bread - I make all sorts of braided sweet breads using the tassajara bread book.

6) Chocolate Covered Pretzels - just follow the melting directions for your chocolate of choice dip the pretzels and let cool.

That's pretty much it. Most of these I make weeks ahead of time and freeze. This allows me to pull things thing out at the last minute if I need to, and I never feel too rushed.
Have a great day!
-Lisa

Tuesday, December 21

Winter Solstice 2010


This is the first year that we are actively celebrating Winter Solstice - and what a year to start. I'm not sure if many of you were aware (though if this is a day you celebrate regularly, I'm sure you are), but this morning was a lunar eclipse. The first lunar eclipse to fall on Winter Solstice since 1638! It's not predicted to happen again until 2094 - which, well, I know I won't be here, but hopefully my children will...

And so, with that said, yes, I was up at 3am watching the moon...

What a beautiful start to the darkest day of the year. I really wanted to have special Solstice pajama's for my children to wear tonight, but I think I put too much on my plate this year as far as crafting is concerned, and it just didn't happen (although I suppose there is still time... yes, I do in fact think I may be nuts, lol).

We will be having a larger than normal, fancier than normal dinner tonight (I hesitate to call it a feast), and a candle will burn until we go to bed. Just small ways to celebrate the coming of longer days, warmer days, and soon to be fertile land.

Wishing you all a beautiful day!
-Lisa

Monday, December 20

Ordinary Monday

**A new Monday ritual. A single photo of something ordinary and small in our days, but still filled with happiness and moments worth remembering**


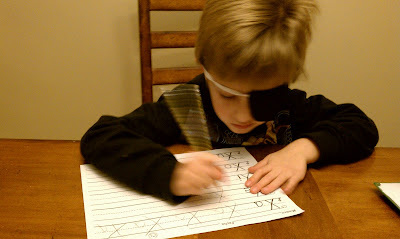
Because Pirate's get their homework done faster than little boy's do...


Wishing you a beautiful start to a wonderful week!
-Lisa :)

Friday, December 17

Handmade Holiday Outfits Part 2


So perhaps not the BEST picture, but trust me, it's sooo cute in person! This is the matching bow tie I talked about making in this post last week. There's tons of tutorials online for them, and they whip up in a snap. I'm pretty sure this little guy took me about 15 minutes start to finish.

I was shocked when Austin excitedly tried it on when I was finished. I thought there would be bribing involved, lol.
I'll share our Holiday picture with both of the kids wearing their momma made gear when it's ready.
Have a great weekend everyone!
-Lisa

Thursday, December 16

Feathered Friends


This time of year, at least for us, creates a pretty barren food supply for our local birds. Every year we try to help them out by filling up a couple large bird feeders. The birds only seem to get a small snack from those because we also have a furry little (well not little really) raccoon family near by. Intelligent as raccoons are, no matter what we do, they always empty out those bird feeders in less than a day. I want the raccoons to see Spring time just as much as I'd like the birds to, don't get me wrong, but those furry little masked bandits have a lot more options than their feathered neighbors.

So, we're trying out something new this year. The kids and I sat down one afternoon and made a very large amount of seed cakes to hang from the trees and bushes. So far the raccoons have stayed away from them. I'm hoping it stays that way, but we'll see. We made a combination of small and large cakes. The small ones were molded in an ice cube tray, with the hopes that maybe I could include them in my gift giving (as alternative ties/tags). Though my husband only responded with an eyebrow raise. Poor man, he must think I'm nuts. He'll go along with it, but not while keeping a straight face.

And so, some will be tied to our trees, and others will be tied around packages so a few more birds can be fed. Honestly, the one batch made too many for our little area to keep them all in one place.

If you'd like to try some yourself, this is what you need:

1 box of gelatin (yes all 4 small packets inside get used) or reserved cooking fat
3-4 C bird seed - depending on what you use
3 C Hot water
wooden spoon
wooden skewer or pencil
baking sheets or large flat surface
parchment paper
cookie cutters (or ice cube tray or both)
jute, kitchen string, or yarn for the ties - cut to around 10-12" each

1) Dissolve the gelatin in the 3 cups of hot water by stirring. If using the cooking fat, warm it up until it is in it's liquid state again. If you choose to use the fat, it's fine in the winter, but avoid this in the summer because the fat can go rancid in the heat.

2) Add the bird seed one cup at a time until it won't combine anymore. This should be very thick, but you should still be able to stir it well.

3) Place parchment paper on the baking sheet (I did this so I could transfer to the fridge for quicker setting times) or just on a flat surface.

4) Lay the cookie cutters on the parchment and then spoon the seed mixture into them. Pack them in good.

5) Using a skewer or pencil end, make a hold half way threw the mix to push your string into, then cover with more bird seed to secure. You might want to tie some knots into one end of the string so it has more "gripping" ability inside the mold.

6) Allow the mixture to set by either putting it in the fridge for a few hours, or allowing it to sit overnight on the counter.

That's it!

Take care,
Lisa :)

Wednesday, December 15

Our Little Gnome


I'd like to introduce you to the newest inhabitant of Hannah's Christmas stocking. Thankfully he's small enough that he has managed to go unnoticed inside the toe of that large sock. He is, in fact, my first little Gnome creation, and I think I'm hooked. There is just something about this little guy that I'm drawn to - and I know Hannah will be too, which makes it hard to leave him in that stocking of hers...

He's simple enough, made from a solid wood peg, and natural dyed wool felt. Add a little embroidery floss and a bit of glue and you have yourself this quirky little no-name gnome. He didn't take long to make, so I'm sure he'll have a few friends with him come Christmas morning. If you'd like to make one yourself, here's the free tutorial.

Take care!
- Lisa :)

Tuesday, December 14

Lessons Learned from Dough

There is a lot to learn by the simple act of making, shaping and cooking dough. Especially for little hands and the minds that move them.

Think about the last time you made something from scratch. How did you feel when you were done (assuming it turned out ok)? Satisfied I'm sure just came to mind, or something close to that.

Imagine the impression that would have on a small child.

I know for me at least, that as a parent, I often find myself finishing tasks (or perhaps just doing the whole thing) for my children, assuming it will get done faster and without a mess my way. It dawned on me the other day, that by doing this, I'm pretty much telling my children that they are not capable of completing these tasks on their own. When truly, if given enough time, and the space to make mistakes, they most certainly could do that task in question, and probably a lot more.

Which leads me to dough. Yes, dough.

Making dough is great for all ages, and offers plenty of room for learning at various stages in childhood. Think about it. Measuring out the ingredients will provide simple math and space lessons for preschool kindergarten aged children. For older children, you could have them convert the amounts to double, triple or half the amount to work on multiplication or division. Simple pouring and stirring are great hand eye coordination developers in little children. Kneading and working the dough into it's desired form helps to fine tune small motor skills - something a lot of children seem to be falling behind in during recent years.

The best part, in my mind, is the sense of satisfying accomplishment and the confidence boost your child will likely get from doing this. Knowing they can take a few simple ingredients, mix them together and then create a satisfying snack for themselves is empowering for a small child.

We make soft pretzels. I chose this because it's a simple dough recipe, and only takes about 10 minutes in the oven (but does still require time for the dough to rise - so keep this in mind if you choose to try it. Allow about an hour for rising).

My children loved doing this so much that they have not stopped asking about it, and I have promised to make it a Saturday morning ritual. I'd love to do it daily if we could, but right now that just won't work with our days.

Below is our recipe if you want to try it out. I swear these are soooo good - almost better than that famous pretzel house in the mall ;)

Soft Pretzels

4 tsp yeast
1 Tbsp Molasses
1 & 1/4 Cups Warm Water - should not feel hot or cold when placed on your wrist
1/4 C Honey
4-5 Cups Unbleached White Flour
1.5 tsp salt
1 Tbsp oil


1/4 C Baking Soda
3 Cups Hot water

Sea Salt for topping (optional)


1) Dissolve yeast in water and molasses then add the honey and stir well to combine. Let sit for 10 minutes or until it looks frothy.
2) Mix the salt in with the first cup of flour. With a wooden spoon stir in 1 cup of flour at a time until the dough can not handle anymore. This will vary almost every time you bake, so always take the time to do this step.

3) Once you can no longer stir the dough with a spoon, either place it in a stand mixer with a bread hook to knead the dough, or knead by hand - and continue adding a little bit of flour at a time until the dough is no longer sticky, but is still moist enough to hold a solid ball shape.

4) Pour 1 tbsp of oil into a large bowl, and place the dough ball on top of the oil. Flip the dough over a few times to make sure it is coated in the oil. Place a towel over the top of the bowl and put in a warm spot until the dough has risen to twice the original size (this can take anywhere from 30 minutes to an hour or more depending on how warm your dough is kept).

5) Pre-heat oven to 450 degrees.

6) Pull apart small sections of the dough and shape however you like.

7) Once all the shapes have been made, make the baking soda and hot water mixture. Dunk each shape in and then place on a parchment lined baking sheet. Sprinkle with salt if desired.

8) Bake for about 10 minutes or until golden brown.

Enjoy!
-Lisa :)


Monday, December 13

Ordinary Monday

**A new Monday ritual. A single photo of something ordinary and small in our days, but still filled with happiness and moments worth remembering**

This is often where I find myself in the quiet of my evenings - after the little ones (and the big one!) have gone to bed.


Wishing everyone a beautiful start to a wonderful week!
-Lisa

Friday, December 10

Some Time

I've decided to take a little time away from blogging. I need to hash things out and re-organize a bit. I'm sure you understand :)

I will be back on Monday.

I wish everyone a wonderful, warm and peaceful weekend.


Take care!
-Lisa :)

Thursday, December 9

Keep Little Hands Busy

I'll be back to regular blogging tomorrow, but in the mean time, I wanted to share this link with you. I stumbled upon it the other day, and I'm so thrilled that I did! It's such a simple, yet creative idea - I love it!

They are play discs, over at Made by Joel. I won't use images from other blogs - so I really do encourage you to stop over there and try these out. They are beautiful in design and construction. All you have to do is print the free templates and then cut out the discs. They fit in a candy tin, and can travel easily in a purse or pocket. The little discs provide lots of entertainment for little ones (think restaurant here).

Take care!
-Lisa

Wednesday, December 8

Handmade Holiday Outfit

Yee! Ok, I'm excited to share this little project with you all. Every year I outfit my children in semi-matching holiday garb for our pictures. And every year I end up spending more than I'm comfortable with - at least for an outfit that will only get worn less than a handful of times.

Well this little diddy, cost nothing! Yup, that's right, nothing. Annnnd, it's momma made, which makes it all that much more special to me ;) The fabric was from granny Grace (thank you!!), and the long sleeve onesie was being used as an undershirt already because of a very ugly stain on the front. Well, with a little bit of strategically placed applique (similar to this process), and some sewn on ribbon to create a "present", the top was done (in about 15 minutes!).

The skirt was made from the Lazy Days pattern that you can find for free here. The skirt took 30 minutes to complete, and it's the first time I ever made one from that pattern, so I'm certain the ones to follow will go even faster - if you can imagine that. And yes, there will be lots and lots more.


The photo above is off in color, but I wanted to give you a full length view of the skirt.


My plan is to make a simple bow tie out of the same fabric for my son to wear with a white button down and blue jeans for our photos.

Happy day!

-Lisa

Tuesday, December 7

Pastels


I decided to introduce Hannah to pastel's last week, and wow did she take to them! I like to give my children an opportunity to explore different art mediums without an agenda or project to complete - at least at first. This allows them to have a more relaxing and enjoyable experience - no stress, no expectations.

She's been asking to use these on a daily basis since then.

Pastel's are great when used on a slightly textured paper (we used newsprint - super inexpensive and available at most arts/craft stores, and VERY large). The colors are vibrant, and easily blended and smudged together.

If you want to keep a semi-clean toddler while doing this, give them a play shirt and have a damp towel on hand.
Take Care!
-Lisa

Monday, December 6

Chewy Ginger Snaps


And it has officially started! Cookie baking! I love making all the cookies for this season, not to mention eating them too, eh hem...

This is a new recipe we tried out, and Austin declared that they MUST be the cookies we leave out for Santa. I agree.
I found the original recipe here, but modified the ingredients a bit. So here's how we did it...

Chewy Ginger Snaps

3/4 Cup Butter (grass fed) - softened
1 Cup Raw Sugar (+ 1/2 Cup for rolling)
1 Egg (pastured)
1/2 Cup un-sulphured molasses
2.5 Cups Whole Wheat Flour (or any kind of flour - I bet spelt would work nicely)
2 tsp Baking soda
3 tsp Ground Ginger
1 tsp Cinnamon
1/2 tsp Sea Salt

1. Pre-heat the oven to 350 degrees

2. Cream together the butter and sugar. Add the egg, slightly beaten and the molasses and mix until well blended. Sift or whisk together the flour, baking soda, ginger, cinnamon and sea salt. Add half the flour mixture and stir until well combined, add the other half and mix well.

3. Make small balls (about 1") by rolling pieces of the dough between your hands, and then roll around in the the half cup of sugar.

4. Place the balls on a parchment lined baking sheet (do not flatten the balls), and cook for10-12 minutes.

5. Allow to cool for 1 minute on the baking sheet, and then transfer to a cooling rack.

This makes about 36 cookies.
Enjoy!
-Lisa :)


Friday, December 3

Right Now

No words on Friday's, just an image or two of our week...


Have a great weekend everyone!
-Lisa :)

Thursday, December 2

A Place of My Own


After months and months of clearing off the kitchen table, lugging out my machine and thread and fabric and goodness knows what else, each and every time I wanted to sew, I have finally created a space all my own.

A space that allows me to keep everything exactly where it needs to be at all times.

I don't think I'll venture as far as calling it my own studio space (ok, well, maybe in my mind I will), but it is a space, just for me and the things I do.

And oh my goodness am I excited about it! Seriously, I can't even begin to describe my excitement. It is so much easier to get projects done. If you have your own space, you know what I'm talking about. If you don't, try and make room for one.

Mine is not glamorous by any means, in fact, it's far from it, lol. I have sectioned off a very small portion of our unfinished basement. I placed a fold out banquet table there, accompanied by, of course, a folding chair, lol, and an odd shape of remnant carpet underneath. I was able to organize our wire rack pantry to accommodate my fabric stash, and ta-da! Instant working space.

I refuse to show you anything but close up pictures right now, because really, it's just a basement, and not all that pretty. I'm just so excited about it (and my new serger! - you can tell I haven't used it yet from the photo, lol), I couldn't wait any longer. I've been using this space for about 3 weeks now, and I'm getting so much more done. I'm pretty happy, in case you couldn't tell :)
Have a great day!
-Lisa :)


Wednesday, December 1

December & One Small Change


Happy First Day of December!

The very last month of the year, and filled with holidays, activities and most likely stress.

Along with "greening" up the holiday season, I also want to start "toning down" the hustle and bustle. My overall goal is to just keep things simple.

Much easier said than done.

I typically find myself wandering mentally about all the great things I want to get done this month, and all the gifts I want to give (eh hem, make) and all the shows our family should attend, and on and on. Now, every time I catch myself doing that, I take a deep breath and just try to stay present in the moment. Otherwise I know, I'll turn around and the season will be over, decorations will be coming down and I'll be searching for homes for the children's new play things. I don't want that this year.

And so, that leads me to introduce you to a site I came across recently. One Small Change The objective of the site is similar to what I talked about in this post a while back. But what's really nice about One Small Change is that they offer not only suggestions, but also camaraderie. Readers share what it is that they are changing at the beginning of each month, and then follow up near the end to share how it's going. I plan on sharing my changes on the first of each month here on my blog as well. I would love to hear what your thoughts are on this, and if you're participating.

This month, my focus is on creating a nightly family story time. We have a specific chair in our living room for the reader to sit in while telling the story. It's something we do sporadically, but I feel it would have a much more profound effect if it were nightly. It's great for my five year old and his reading comprehension, as well as a nice way to teach my two year old to sit in one place for the duration of the story. This should be a great opportunity to keep us connected and present. Not to mention it will likely create a warming memory for my children to look back on when they are adults.


Take Care!
-Lisa