Thursday, September 30

Insanely Good Oatmeal Raisin Cookies

Oh how I love oatmeal raisin cookies! By far my favorite cookie of them all, hands down. Especially this recipe. When you make these, please use the same type of ingredients listed in the recipe, or they just won't be as good. I promise, they are sooo worth the quality ingredients the recipe calls for.

What you need:
16 Tbsp grass-fed butter softened (I use Kerrygold, the best butter I've ever had truly!)
1 Cup Brown Sugar
1/2 Cup Sugar in the Raw
2 Farm Fresh eggs
2 tsp Pure Vanilla
1.5 Cups whole wheat flour
1 tsp baking soda
2 tsp Cinnamon
1/2 tsp Sea Salt
3 Cups Rolled Oats
1 Cup Raisins

1) Pre-heat Oven to 350 degrees
2) Cream the butter and both sugars
3) Add eggs and vanilla and beat until well blended
4) In a separate bowl, whisk together flour, baking soda, and sea salt
5) Add half of the dry mix to the wet mix and blend well. Add the rest of the dry mix and blend well.
6) Stir in the oats and raisins until well mixed.
7) Place dough the size of a golf ball on a parchment lined baking sheet, well spaced, and bake for 15 minutes or until lightly brown.
8) Allow to cool for 1 minute and then transfer to a cooling rack.

For chewy cookies, only cook until the edges are slightly brown and then remove. It's hard to tell when you use whole wheat flour, so be sure to take a good look. I make pretty big cookies, so they need the full 15 minutes. If you make yours smaller, reduce the cooking time.

I hope you enjoy these as much as my family does!


Wednesday, September 29

Apple Pie Filling


A friend of mine at work told me about her wonderful way of not letting soon to go bad apples actually go bad. It's such a great idea that I have to share, I'm sure she won't mind.

Simply peal, core and slice the apples. Mix in a bit of lemon juice (I used the juice of one lemon for both jars here), some vanilla, brown sugar and then freeze to store. This way, as soon as I finally get around to making that apple pie for Austin that I promised him for his birthday (thank goodness I have till February!), I can just pull one of these jars out of the freezer. And now I take comfort in knowing none of the apples we picked will go to waste.

Did you find this helpful? Do you have any of your own waste-not tips to share? If so, please do!

Have a great day!

Tuesday, September 28

Toddler Floor Cushion


I'm sooo excited about this little project of mine! One, because I've never really done a furniture type sewing project, and two, because it started out as a vintage curtain panel. I love, love, love finding vintage fabrics. Giving new life to something outdated, or what would otherwise be considered useless is such a thrill for me - really! Annnnnd it makes sewing your own stuff cheaper, instead of more expensive. I think that was one of the biggest disappointments to me when I first starting sewing - it was just so much money to use everything new. I think one of the biggest tricks to making something new from something old is thinking outside the box (for lack of a better term). Linen tea towels and tablecloths, vintage pillowcases, and even corduroy pants, skirts or jackets usually have enough material to make tons of different projects. When you creatively find ways to mix the old with the new, and pair unlikely fabrics or textures together - you end up with such amazing projects. I'm currently drawing up a bunch of different designs utilizing mainly items found thrifting, and I can't wait to share some finished projects with you!

For this project, I followed someones else's tutorial. This one comes from Susan over at Living with Punks. She has a great blog with TONS of tutorials and creative projects - it's definitely worth checking out.

I do want to add the total cost of this project for me, because it really didn't cost much at all. The retail price of this chair, were you to buy it at say, Pottery Barn Kids, is close to $70 - yikes! Mine, on the other hand, came in at less than $6.00! And it was worth every penny to watch my little girl bounce up and down on her cushion, singing "Hannah's Chair!" over and over again.
Take Care!

Monday, September 27

Popsicle Stick Puzzle

Popsicle Stick Puzzle

I saw this project in an issue of Family Fun at my local gym and just had to do it. Hannah could have cared less about this one, and only drew a few scribbles on two sticks and then was off to start her own dance party (oh Hannah...). Austin on the other hand, liked it, but came up with a better idea...

Austin decided that this project was much better off as a fence building endeavor.

But if you'd like to do it the way it was designed to be done, please follow along.
Line up 5 or more popsicle sticks so that they are right next to each other, and let one side hang off the edge of a table or counter. Wrap tape around one end, and then draw a picture of whatever you'd like on the popsicle sticks. When your picture is done, remove the tape.


Mix the sticks up and let your child go to work...


I think this idea is really cute. And if my children decide they like this as a puzzle, and not just a pretty fence, I will make more. I must say though, I was impressed by Austin's creative thinking.


Take care!


Friday, September 24

Friday Fun - A Fun Picture from the Week

A few days before Austin's first day of kindergarten, we went to the school to meet his teachers and his future classmates. It was a bit hectic to say the least in that room, and we had a pretty stuffed folder of papers to fill out. His new teacher asked that we each take a picture of our child with one of the disposable cameras she brought in, for a project they were going to do during the school year. I snapped Austin's picture and went back to filling out paperwork. Right before we left, while I was trying to figure out a time slot for his parent teacher conference, I heard Austin next to me "Say cheese Mommy!". Without giving it any thought, I turned around, said "Chee..." then realized he was snapping my picture and my "cheese" turned into "Noooo..."

Well, this Monday (after completely forgetting about the whole thing) I opened up Austin's school folder to this...


Enjoy your weekend everyone!

Thursday, September 23

Jack Skellington Take Two

I finally finished the smaller version of the Jack Skellington hat for Austin! Annnnnnd this one actually fits him. Though you wouldn't know from the picture because he kept running away from me laughing while I was trying to put it on him. Then he insisted that "Mr. Bear" model it for me (mind you we're talking about a four foot stuffed animal with a ginormous head - sigh...). So, here's a picture of me wearing the hat, because really, a flat photo of this hat just does not do it justice. If I just scared you for the morning, my apologies.... And if you'd like to make one yourself, here's a link to the pattern.

Take care everyone!

Wednesday, September 22

Canvas Tote Refab - Betz White

I have (had), this really drab canvas tote that I use for the gym. It was terrible, and had a large ugly orange stain on it from who know's what - seriously. I don't know why I kept using it. But anyway, I came across a really simple and super fast way to make it pretty! What's even better, I didn't spend a dime! I used a scrap piece of upholstery fabric that was given to me by Granny Grace (you'll see her name a lot in here by the way - and thank you again!) to cover it. The tutorial was written by Betz White. If you're not already familiar with her work, I highly recommend checking out her blog here.

Drum roll please.........


Ta-Da! I love it!


Here is the before picture - look at that awful orange stain! Blagh!

Start to finish, this took about a whole 15 minutes. To see the tutorial, and easy to follow directions, click here. Or look at the "What I'm Loving Now" section of my blog.

Thank you Betz White :)


Tuesday, September 21

Transitioning to a Healthier Lifestyle - Part 1

A few weeks ago, I wrote a post about real food, and transitioning to a healthier lifestyle. It's not something you want to just jump right into, especially when you are not the only person you are feeding.
Taking baby steps is the easiest way, not to mention probably the best method in making it a lasting change.
I think it's important to note that I started down this path close to a year ago (though I have always been a bit of a health nut), and I still want to improve our diet. I have learned to relax over time and have realized that even though I want this so badly, my family is not quite so gung-ho about it. That being said, I've tried out hundreds of different recipes (okay, maybe not hundreds, but it sure does feel like it sometimes), and have only found a good handful or two of keepers. I consider a keeper a recipe that 3 out of the 4 of us enjoy. Be sure to check out the Recipe tab to see the meals I've been able to convince my picky family to eat.

So here we are! The first part of making a transition into healthier living.


One of the easiest adjustments to living a healthier lifestyle is to swap out anything made of refined white flour and white grains to whole wheat flour, and whole grains.

Make sure when purchasing the word "Whole" is included in the description and ingredients. Wheat bread is not the same as whole wheat bread - it has been refined, even though it doesn't have the bright white appearance.

White refined products are pretty much fluffy candy bars - they have hardly any nutritional value at all. The vitamins and minerals refined products are "enriched" with are all synthetic, which means your body has to work twice as hard to break down and digest them - thus sapping energy from your day.

Ruth Yaron, author of Super Baby Food has said, "The whiter the bread, the closer you are to dead" - and though it's a bit of a scare tactic (the only one in the book really), it has too much truth to it.

Make The Change:
-
Don't let yourself get overwhelmed. Once you run out of something in your pantry, make a note of it for your next shopping trip, and make sure to choose a healthier whole grain variety.

This can add years to your life and help you lose weight. Whole grains have more fiber, and fiber forms bonds with fat in your body, and then gets carried out together after digestion. You lose about 7 calories per gram of fiber in each meal.

Make sure that you are comfortable with this dietary change, before moving on to the next step. If you have a family you need to feed, make sure to slowly adjust to the whole grain products so no one refuses to eat them. Doing a drastic switch typically does not fare well with anyone (especially children and husbands :) )

Monday, September 20

Bread Bag from repurposed Tea Towel


I'm not sure what it is about tea towels, but I love them. Like, really love them. Ohhh, and if it's a vintage tea towel that I might happen to find, my whole day gets better. Yes, that is how much I love them. I would never dare use them as a towel, but I do want to use them. Mainly so I can look at them more often and get some use out of them. They really don't do anyone much good sitting folded on my fabric shelf.

And so, I went on a search for ways to repurpose tea towels. I found a couple so-so ideas, and a book that I most definitely plan on checking out of the library soon (very soon), and then came across this tutorial at ieatfood.net.

I love this idea too because I've been making my own bread for almost a year now, and have been storing it in plastic bags and I wanted to move away from that. All of the tea towels I collect are made of linen, which will allow enough air passage to keep the bread soft, but not stale. I can't wait to try it out! I think I'll probably do some tweaking on the overall design of the bag. I want it to fit one of my loaves better. When I do, I will be sure to share.


Some of my bread - yum!


To make the bag follow this link to the tutorial.


Friday, September 17

Friday Fun

Once in a while, I find that I need to stop, breathe, and not take myself so seriously. Most of the time, my children, without realizing it, pull me back to where I need to be, and we usually end up laughing like crazy. I thought I would share some of those moments with you all, because, as my son would say, they make my heart smile...


Have a great weekend everyone!


Thursday, September 16

Vintage Little Girl's Winter Hat

My grandma pulled this pattern out of her huge knitting closet (yes, she has an entire closet filled with yarn, needles and patterns), and offered it to me a little while back. I love, love, love it! I couldn't wait to make it! And so I did....

I made the hat out of funky colors because I thought it would go better with my little girl's wardrobe. At least I got that part right... Silly me for not looking at the photo and realizing that my daughter's two year old head would be a bit too small for this cap. It was however, a fun knit, and I plan on making another. I left the pom-pom off of the tip, because I'm just not much of a pom-pom girl.

That being said, if you like the hat, you can have it. For sizing purposes only (of course) I had my 5 year old son try it on, and it fits him well.

The first person to leave a comment in the comment box below gets the hat! If you are the fist person to comment, I will also need you to email me at lisa_palubicki@yahoo.com so I can get your shipping information.

Take Care Everyone!

Wednesday, September 15

Quick and Easy Pesto Recipe


Ok, so I know I could have probably taken a better picture of the pesto for you all, but really, I'm pesto-ed out and can't bear to put it on another dish. But I did want to share the recipe with you, and a visual always helps. Figures I never thought to take a picture of it on our Gnocchi, tortellini, or in the calzones...

This is super quick and easy, and tastes amazing! It uses a lot of basil though. I think I used 5 full plants from my garden to make just the one batch.


What you need:
2 C Fresh Basil
3/4 C Olive Oil
1/4 C Walnuts
1/2 C Parmesan Cheese
2 cloves Garlic
Salt & Pepper to taste

1) Combine ingredients in blender and blend - that's it!

Take Care!

Tuesday, September 14

Toy Hammock from Upcycled T-Shirt

Austin has a pretty large collection of Transformers. They are by far his favorite. And if you ever ask him about them, be prepared for at least a thirty minute explanation or story. He does make it entertaining though, he's a pretty animated little guy.

Anyway... He transforms them so much, that the hinges on a lot of them are going bad, and pieces were disappearing. Not to mention a little girl kept sneaking into his room when he wasn't looking. She had a tendency to run off with parts to his "formers". So, our solution was to create two bags for his transformer toys, one for the autobots and one for the decepticons. I used two of my husband's old white t-shirts (he has tons!) - one shirt for each bag, and labeled each drawstring hammock with either the autobot symbol or the decepticon symbol. I used freezer paper to create the symbols. If you are not familiar with the freezer paper method, or need a quick reminder on how to do it, check out my old tutorial here.

These have worked out great so far! I have them hung low enough for Austin to reach in and grab what he needs, but also high enough so his little sister can't run off with an autobot leg or head, lol.

So, on to the tutorial!

What you need:
Old T-Shirt - any size, and regular fit
Sewing Machine
Scissors
Thread
(The following are optional for the stencil)
Freezer Paper
Acrylic Paint or Fabric Paint
Sponge Brush
Exacto Knife


You start with a plain T-Shirt


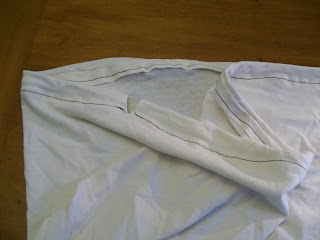
Cut off the top, arm pit to arm pit. Cut apart the top piece, in the chest area, around the raglan seams so it looks like the photo above.


Take your largest pieces and pin along the cut edge (leaving the original hemmed bottom alone. Sew together to form a large sack.


Take one edge and lay it out flat to form a triangle.


Determine how wide you want the bottom of your bag, and then sew across to form a triangle. I went in about 2.5" from the tip. Repeat on the opposite side.


Take your scissors and trim off the triangle tip so it looks like the photo above. Do the same on the other side. You should now have a sack with a flat bottom.


Take the hemmed edge of the T-Shirt and cut a small slit on each side of the bag, about 2 inches down.


Fold over and pin down one side.


Sew together, making sure to leave a space large enough to pull threw the ties. Repeat on the other side.


This is what it should look like. Don't worry about sewing the slits. The nice thing about T-Shirts is that they don't really fray or unravel.


This is what the bottom of the bag should look like.


Take the piece of shirt that you cut earlier from the top portion, and cut off three half inch to inch strips along the length of the shirt piece.


Tie them together to form a really long strip, but not a circle, you need to thread this. If you want cleaner look to your drawstring hammock, you can also use yarn or ribbon. I wanted this to have more of a boyish look though.


Attach a safety pin to one end and thread it threw both sides. Tie the ends together to form one large loop, and then pull a bit from each end out of each slit.


This is what you should have. You can stop here, unless you want to decorate the bag like we did.


To add a stencil to the bag, follow my tutorial here.
And that's it!

I hope you enjoyed this tutorial!
Take care,