Tuesday, November 30

Table Runner / Trivet

Last Thanksgiving, which was the first time I ever hosted, I had trouble finding places for all of the hot food. I won't dare place hot dishes directly onto the table itself. So I was left with the options of either putting towels under everything (which we don't have enough of anyway) or leaving the dishes on the counter. We did the later, but I didn't like that everyone had to keep getting up from the table.

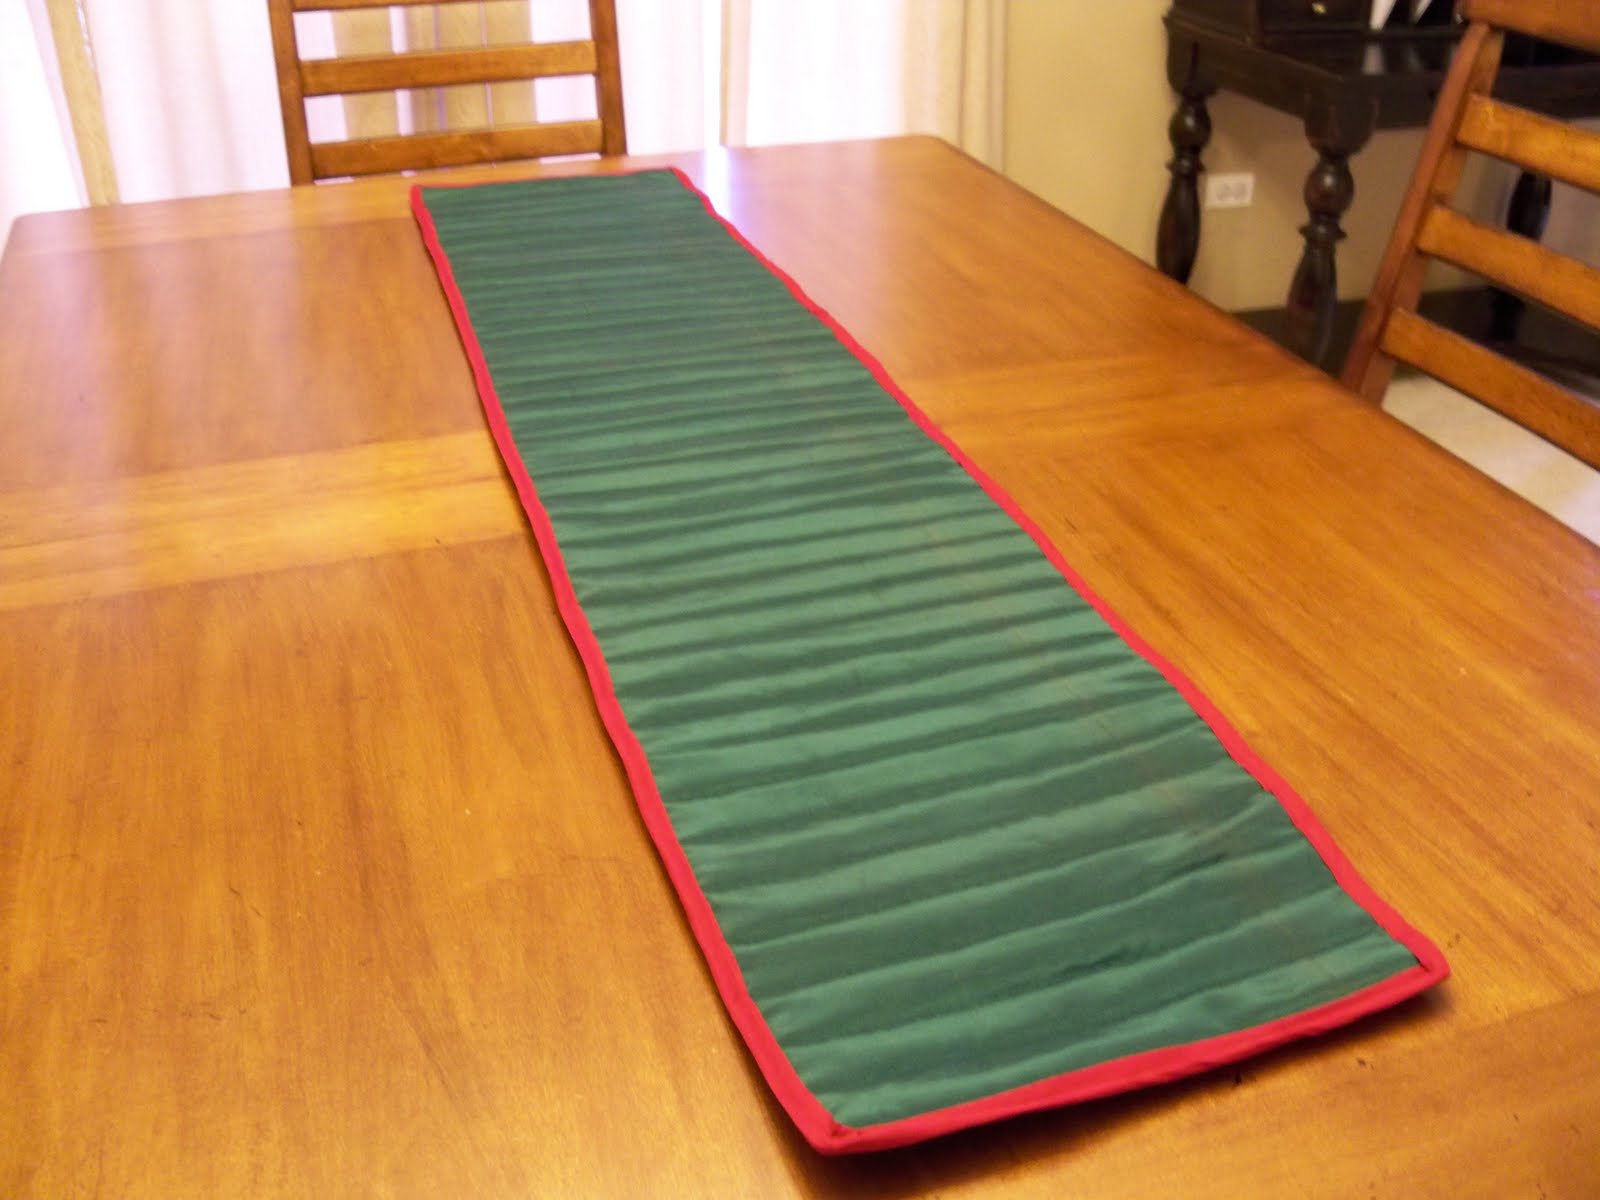
This year I came up with an idea. Why not make a super long trivet for all the food? So, that is what I did. I pretty much followed my trivet/pot holder tutorial, but just kept the bottom part. Our table can very comfortably seat 10 when the extensions are in place, so I made sure it was long enough to accommodate that. I quilted the insulated batting straight up and down so that the ends would fold over neatly, and so that it would roll up nicely for storage (see the photo above).

This really came together pretty easily - aside from the biased tape. I swear, I hate the stuff. I just can't ever get it to look nice. The fabric, again, was from Granny Grace, so the total on this project set me back I'd say about $5 or $6.

The photos below show how it's used. Unfortunately, I decided to start making this the night before Thanksgiving, and was still working on it when my family arrived. Thankfully they're pretty laid back, so the fact that it still had pins in place, and long threads hanging off the sides didn't phase them :)

I finally sat down and finished this yesterday afternoon.


Have a great day!

Thursday, November 25

Gratitude

photo credit

Happy Thanksgiving!

I'm grateful for so many aspects of my life and my family, but for today, on the blog, I want to express my gratitude to you. I appreciate the few minutes (or perhaps more) you spend reading what I have to say. This is my outlet, a place to express creativity, and to focus on the joy in my life. My life is not perfect, as no one's is. So here, I like to keep the focus positive for those days when my world feels like it's spinning out of control. It's a quiet reminder of the good, and I can visit it whenever I need to.

Thank you for watching these moments with me, and for sharing some of your own.

I wish everyone a peaceful, warm and rich day!

Wednesday, November 24

Pom Pom Plants

I've been doing sooo much holiday crafting lately, and I want so desperately to share some of the projects with you. At the moment, though, I can not. Simply because many of the recipients read this blog - and I love that they read it! :) But I'm not about to ruin any surprises.

So with that said, I'd like to talk about this fun little project I came across on craftster the other day. Pom Pom Plants! Maybe I'm a little goofy (ok I am a little goofy), but I just love these. If you ignore the poor photo quality, these really do turn out cute - and it's a great use for those twigs that are all over the place right now. Not to mention a great way to use up yarn scraps.

It's super simple to do. Just collect some medium size fallen twigs, make pom poms, and then glue the twig inside the pom pom. If you're not familiar with making pom poms, or would like to see step by step instructions, you can view that here.

Enjoy!

Tuesday, November 23

The Center Piece

Over the weekend, I had the kids pick out objects from outside that they would like to put together as a center piece for Thanksgiving dinner. The photo above is what they chose (and I snuck a few gourds in the mix for color). They are excited to be playing a part in the preparation of the day, and had a wonderful time exploring nature in the process. If you've never done something like this, give it a try. It's a calming experience for everyone - as long as you don't try to dictate what they pick. You might even come across a few new discoveries for yourself along the way.

Here's a few more photos from that day...


Have a wonderful day!
- Lisa


Monday, November 22

Oven Roasted Veggies


With Thanksgiving just around the corner. In three days to be exact, yikes! I thought it would be a good time to share one of our favorite (as well as easiest) side dishes. This will definitely be on the table on Thursday.

Oven Roasted Veggies

1 Acorn Squash, seeded and cubed (we leave the skin on)
1 Butternut Squash, seeded and cubed (peel the skin off)
3 Carrots cubed and then cut in half
2 Potatoes Cubed (skin on)
1 Onion Sliced
1 tsp Minced Garlic
2 Tbsp Olive Oil
Sea salt and Pepper to taste

1) Put all of the veggies in a large bowl and drizzle olive oil over the top. Add the garlic and salt and pepper and stir a few times to make sure the veggies are evenly coated.

2) You can leave these in the bowl in the fridge to marinate for a few hours if you want the onion and garlic flavors to be more prominent. Otherwise, line a large baking sheet with parchment paper and spread the veggie mix evenly over the surface, making sure it's in one layer.

3) Bake at 400 degrees for 35-40 minutes, or until the veggies are lightly browned and tender.

That's it!

Try it, you'll be amazed how good it tastes! I'm pretty sure I could live off this side dish alone. Well, maybe...

Have a great day!
-Lisa

Friday, November 19

Right Now

No words today, just an image that makes me smile...


Have a great weekend!

Thursday, November 18

A Quiet Place


I've been working on putting together a quiet place for my children over the last week or so. You can read about the beginning of this here.

It's amazing how noisy a little one's life can be if you think about it. Background media noise, crying children, noisy pets, constant bus or car chatter, classroom activities, and flashing gadgets are just a few. None of these things on their own a necessarily a bad thing, but combined together into one full day can be stressful. I know I can't handle constant stimulus, so I don't think it's fair to assume my children can handle it either. Which leads me to their "Quiet Space".

We had a tent set up for the kids to play in, but it ended up just turning into a catch-all for a bunch of stuffed animals, that really, no one ever went near, except for the dog. I cleared all of toys out and only held onto a few favorites. I put a few of the most loved books inside the tent, along with one or two stuffies, and a really soft "Sherpa" rug (I don't have the funds right now to buy anything new, so I had to scavenge around the house and found this scrap piece of fabric from an old project), which in time will be replaced with the real thing.

I also compiled a bunch of books to keep in a wooden box outside of the tent in case they want more choices.

So far, it's worked out really well. I showed both of them the updated tent, eh, quiet place, and what it was for. Explaining that if they want to go somewhere to relax, or calm down, and not have worry about anything else, that's where to go. I have made a promise to both of them that if one is inside and needs to be alone, I will make sure the other stays out until they are ready. I have only had to do that one time so far. Right now, I think they are just both enjoying the "new" space, and have been sharing it well.

Now, if I could just have my own "quiet place"...

Wednesday, November 17

Fairy Wee Folk

Hannah is just obsessed with Fairy's, she loves them, and thinks she is one for that matter. So, it only made sense to have her big Christmas gift this year be Fairy related. We decided on this, and absolutely love it! (I know she won't be checking my blog any time soon, so it's safe to share, lol). It's made of wood and constructed well, so there is no worry of chemicals and lead paint. It will hopefully be a toy she can one day pass on to her own children.

And so, this brings me to the actual fairy part. Though the fairy's made by the same company as the lodge are cute, I had come across some that I liked a bit more in a book called Felt Wee Folk by Salley Mavor.

Oh how I love this book! Not only does it give great detailed instructions, but the images are just beautiful! Salley Mavor does an excellent job creating scenes from her Wee Folk that instantly draw the reader in. Case in point, my 5 year old, who is sooo not into dolls, as he'll tell you, couldn't put the book down. He sat in his chair, head down, and lightly ran his fingers over the glossy pages, only stopping to look up at me to ask if we could make them. All of them. He's especially drawn to Hanzel and Gretel and the Pirates.

There are also instructions for making felt pins and purses. The projects start out very basic and easy enough for a child - so don't be intimidated. I will admit, it took me a while to put together this fairy, but I'm pretty sure it's because I had no clue what I was doing in the beginning. But I am proud of my very first fairy, and know there will be more. Actually, I don't think I have much of a choice. Between Austin and Hannah, I have my Wee Folk work cut out for me. My husband wants some for our Christmas tree too -which I think would look really cute. If you're interested, you can find the book here.

**Just a quick note, these have small parts, and children under 3 should be closely supervised if playing with them.**

Have a great day!

Tuesday, November 16

Insulated Coasters & Upcycling

First and foremost, I just want to say, I'm not too proud of these. I was a little bummed with the bias tape and how cruddy it handled (eh, "I" handled) the corners. I'm sure all it boils down to is that I put it on wrong - I'll have to search that.

But, what I am happy about, is that we had a small problem, and I was able to fix it for free, using materials we already had around the house. I get sooo excited about doing things like that.

We recently purchased a lava lamp for my 2 year old daughter. She has been having trouble sleeping at night, and I thought the slowly flowing globs of color might soothe her a bit. If you have ever owned a lava lamp, you know that the bottom gets very, very hot. So hot, that it made me nervous to leave it on at night for her (which was the reason we bought it).

My solution?

Insulated tiny hot pads!
I made six, even though we only have one lava lamp. I just can't help myself sometimes. But we have found other uses for them. They fit perfectly under my coffee and tea mugs - yea! And if you ask my children, well, they are quite possibly the very best flying saucers they have ever owned.
It was really simple to do. I used one of Hannah's old flannel baby blankets for the outer material. Then, as batting, I took a stained old towel and sandwiched it in between the flannel fabric, pinned it down and quilted the three pieces together following the pattern on the flannel fabric. You could also just do straight lines every inch or so. Using a compass, I drew circles directly onto the quilted piece and then cut them out. I pinned on some thrifted bias tape, sewed it on, and wah-la!

What have you thrown together in a pinch lately? Please share in the comments section!

Take care!

Monday, November 15

Applesauce Our Way

I'm not quite sure what got into me yesterday, buy my goodness was I in the mood to cook! I think I spent more than half the day in the kitchen (thanks Chris!). I had a little kid help too, which is always fun. We made bread and buns (using this book), more rice pudding (oh dear!), pizza, and the hit of the day, applesauce. Applesauce is sooooo easy, and after you have it homemade, it's almost impossible to go back to store bought. Give it a try, trust me, you'll be happy.

What you need:
6 Medium Sized Apples
1 Cup Water
1 tsp Ground Cinnamon
Sweetener (optional - I use 12 drops of liquid Stevia)

Slice and core your apples - we leave the skins on.

Put apple slices, water, cinnamon and sweetener in a large stock pot. Cook covered over medium heat for 20 minutes or until the apples are soft enough to mash.


Remove from heat and allow to cool for a few minutes. Transfer to a blender and puree, or use an immersion blender in your stock pot.


That's it!

Enjoy!


Friday, November 12

Right Now

No words, just images from our week...


Have a wonderful weekend!


Thursday, November 11

Just a Little Bit More


I am on a mission to redo Austin and Hannah's bathroom for as little as possible - where money is concerned anyway. I found this super cute fabric at a local store on clearance, and ended up paying about $2 for two yards. I love it! Look at those cute blue birds and graphic trees - they make me smile.

So, here are two of the projects for that room. The hand towels above were super easy, and took about 30 minutes to finish them both (with Hannah crawling up legs and on and off of my lap). To make your own, just measure your hand towel (I found these in our closet, we haven't used them in years. I just got lucky with the color) and add 1/2" in the height to accommodate a 1/4" seam allowance on the top and bottom. Sew across, and once you get to your edges, trim, fold them under, press and then top stitch.

The second picture is a bath mat (a.k.a. the kids old hand towels). I know this project is from Amanda Soule, but I'm not sure which book it was in. My guess is Handmade Home. I didn't follow instructions of any kind, I just looked at it and decided to wing it (I don't own the book - it's definitely worth checking out though. She is a huge inspiration for me, and if you have time, you might want to stop by her blog - it's amazing and full of beautiful photography). I think I'm pretty close to spot on with it, and even if I'm not, I'm happy with how it turned out.
I plan on making a fabric shower curtain using appliques to mimic some of the graphics in the fabric design. I just need to find a solid white cotton curtain...

Our local hardware store sells VOC free primer and interior paint and the prices are pretty competitive with the smelly stuff - so we'll definitely be going the healthier route for the paint. I'm sooo excited to get some color on those walls!

I have a few more projects up my sleeve, but more updates on that are sure to come.

Take Care!

Wednesday, November 10

A Little Bit of Crafting

I finished my first handbag/clutch project ever, and here it is! I'm so excited about it for so many reasons. One, well, because I love the fabric. I found it on clearance and have lots and lots of it left -woo hoo! The inside is lined with a natural linen - have I mentioned before that I really, really love linen, hmmm... Oh! And that button! I adore it! It is an actual piece of a branch. I found it here. I had originally purchased a bag of them on etsy for a jumper I want to make for Hannah. I miss judged the size though, and I think they might be too big for their original intention.

Here's a shot at the inside lining -sorry for the poor lighting. This was such a quick stitch! I found the pattern for free (gotta love that price!) here. I only struggled a little bit with the pattern around step 5 or 6 because it didn't make sense to me how the bag would eventually be turned right side out, and I kept second-guessing the pattern itself. I do that a lot. I have no reason to, it's not like I'm a seasoned sewer or anything. But I do it, and wastes lots of time - that's me! Anyway, even with all my wasted time, this bag came together in a little over an hour. I know if I make it again (and I will! Soon!) it will go much faster. And no worries, the pattern is exactly right, of course.

Take Care!


Tuesday, November 9

Bowl Full of Beads

Sunday afternoon, the kids and I sat down to string some colorful beads. I know this is such a simple concept, but it turned out to be pretty entertaining, for everyone.

This was great for Hannah to work on her fine motor skills. We used a strip of yarn with some scotch tape around the edges to make threading easier. She also got in a lot of practice naming colors. She adores pink by the way.

And my Austin. What he's holding here ended up turning into a dragon catching device, with more beads evenly spaced out and the yarn ends tied together. It promptly got taken away after it some how, all on it's own of course, went spiraling into our living room window. Thankfully nothing shattered, but my goodness, I definitely didn't see that one coming. And if you're wondering, yes, he did get it back, but with out it's flying power - where's the fun in that mom?


About two seconds after I took this shot, Miss Hannah was up, crawling across the top of the table to get her bead. Which then flew off the table, rolled across the floor, was pounced on by the dog, picked up by me, put back in the bowl and our bead session was officially over. Maybe we'll try again in a few more days...

Take Care!