Tuesday, September 14

Toy Hammock from Upcycled T-Shirt

Austin has a pretty large collection of Transformers. They are by far his favorite. And if you ever ask him about them, be prepared for at least a thirty minute explanation or story. He does make it entertaining though, he's a pretty animated little guy.

Anyway... He transforms them so much, that the hinges on a lot of them are going bad, and pieces were disappearing. Not to mention a little girl kept sneaking into his room when he wasn't looking. She had a tendency to run off with parts to his "formers". So, our solution was to create two bags for his transformer toys, one for the autobots and one for the decepticons. I used two of my husband's old white t-shirts (he has tons!) - one shirt for each bag, and labeled each drawstring hammock with either the autobot symbol or the decepticon symbol. I used freezer paper to create the symbols. If you are not familiar with the freezer paper method, or need a quick reminder on how to do it, check out my old tutorial here.

These have worked out great so far! I have them hung low enough for Austin to reach in and grab what he needs, but also high enough so his little sister can't run off with an autobot leg or head, lol.

So, on to the tutorial!

What you need:
Old T-Shirt - any size, and regular fit
Sewing Machine
Scissors
Thread
(The following are optional for the stencil)
Freezer Paper
Acrylic Paint or Fabric Paint
Sponge Brush
Exacto Knife


You start with a plain T-Shirt


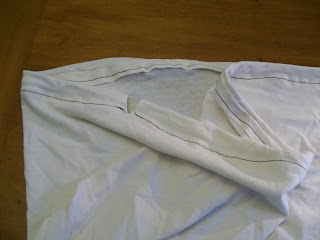
Cut off the top, arm pit to arm pit. Cut apart the top piece, in the chest area, around the raglan seams so it looks like the photo above.


Take your largest pieces and pin along the cut edge (leaving the original hemmed bottom alone. Sew together to form a large sack.


Take one edge and lay it out flat to form a triangle.


Determine how wide you want the bottom of your bag, and then sew across to form a triangle. I went in about 2.5" from the tip. Repeat on the opposite side.


Take your scissors and trim off the triangle tip so it looks like the photo above. Do the same on the other side. You should now have a sack with a flat bottom.


Take the hemmed edge of the T-Shirt and cut a small slit on each side of the bag, about 2 inches down.


Fold over and pin down one side.


Sew together, making sure to leave a space large enough to pull threw the ties. Repeat on the other side.


This is what it should look like. Don't worry about sewing the slits. The nice thing about T-Shirts is that they don't really fray or unravel.


This is what the bottom of the bag should look like.


Take the piece of shirt that you cut earlier from the top portion, and cut off three half inch to inch strips along the length of the shirt piece.


Tie them together to form a really long strip, but not a circle, you need to thread this. If you want cleaner look to your drawstring hammock, you can also use yarn or ribbon. I wanted this to have more of a boyish look though.


Attach a safety pin to one end and thread it threw both sides. Tie the ends together to form one large loop, and then pull a bit from each end out of each slit.


This is what you should have. You can stop here, unless you want to decorate the bag like we did.


To add a stencil to the bag, follow my tutorial here.
And that's it!

I hope you enjoyed this tutorial!
Take care,


Friday, September 10

Family

We have family coming in from out East for the weekend, so I will be taking a short break from blogging. I will be back on Tuesday with a new tutorial for you. In the mean time, I thought I would share a picture that pretty much sums up the week we've had. I'm sure none of you are surprised. :)


Have a great weekend!

Wednesday, September 8

Grapes!


We went grape picking yesterday - so much fun! The kids had a great time. Poor Hannah didn't realize you can't eat these grapes right off the vine. She found out the hard way and promptly spit the half chewed grape onto the ground.

Chris and I tried making grape jam, and then canning it last night. It was the first time we ever tried each one, and both were a huge success! It did however take me waaaay longer than it should have, and I ended up being awake until about 1am canning jam. But, now I know for the future. Annnnd, the jam only has 3 ingredients, so simple!

Click here for the jam recipe we used.

Another site I used last night was sweetpreservation.com. It's not only very helpful, but also fun to look at. Definitely worth checking out if you're new to canning, or have any interest in it for that matter.

I'm trying to come up with some more grape recipes, perhaps ice cream?? I don't know...

What are some of your favorite grape recipes?


Take Care!


Tuesday, September 7

Apple Picking


We went apple picking yesterday. It's the first time we've gone so early in the season and we could only pick Gala apples. I think from now on, we'll always go this early, everyone had such a good time. The kids loved looking at the rows and rows of apple trees, and plucking their very own apples from the branch. Austin, with each apple he twisted off, would hold it up and declare "What a perfect apple! It will go great in our pie!". So I guess I'm baking a pie... Actually, I'm getting really excited about finding new apple recipes to try out. On our list so far, is of course, The Pie, as well an apple breakfast loaf, some apple butter, and who knows what else. I will be sure to share any recipes I may come across that turn out really well.

I hope everyone had a wonderful long weekend!

Take Care!


Monday, September 6

Vintage Pillow Case Skirt Tutorial

Call me crazy, but I just LOVE this fabric! I found this pillowcase at a garage sale for a quarter (gotta love that price tag too). I just couldn't decide what to do with it. The possibilities are endless, because really, even though it's a pillowcase, if you cut open the seams, you end up with about a yard of fabric. So it sat folded up neatly on our counter for a good 3 or so weeks before I finally settled on this skirt idea. My daughter is 2, so this is really long on her, but I love the print so much that I wanted her to be able to at least a couple years out of it. The nice thing about little kids this age is that they keep getting taller, but their waist lines don't grow quite to fast. Soooo this is down to her ankles now, but next year it will be mid-calf, and hopefully (I know I'm stretching it!) the following year it will be just below the knee.... We'll see I guess.

But anyway, here we go!

What you need:
1 pillow case
Coordinating thread
Coordinating ribbon (optional)
3/4" Elastic cut to 1 inch less than your child's waist
Pair of pants or skirt to measure height if doing it my way

First, I went on a hunt for a pair of her size 2T jeans (she was napping and I wasn't about to go start wrapping measuring tape around her, lol). I figured if I cut it the exact height of the pants, that would allow enough space for the elastic waist band to shorten it up so that it wouldn't touch the ground - Lucky me! I was right :) Make sure when you line this up that the hemmed edge of the pillow case is on the same side as the hemmed edge of the pants you are using as a guide. This way you don't have to go and hem it again.
Fold the pillow case in half length-wise and decide where you want to cut.

Using a ruler so that your lines are straight and even, mark where you will cut off the top.


Then cut. Remember, you are cutting off the end that is sewn shut to save yourself from having to hem the bottom of the skirt.

I wanted to add a little more oomph to the skirt, so I attached coordinating ribbon and a bow along the stitch line of the bottom of the skirt. This is completely optional. If you choose not to add the ribbon, scroll down to the photo with the waistband being pinned down. If you do choose to add ribbon, measure and cut a piece long enough to go completely around the bottom of your skirt, and singe the edges with a lighter so that they won't fray.

Pin and then sew the ribbon on to the skirt. I was out of white thread at this point, so I just used invisible thread along the edges of the ribbon, and it worked pretty well.


Now we have to form the bow. Cut a piece of ribbon to the desired length, hold flat in the middle, and bring up each side to form the loops like the picture above.


Pin and then sew the ends down to securely hold in place.


Cut a smaller piece of ribbon long enough to wrap around the center of the looped bow.


Fold the edges down, pin in place and sew along the sides to secure.


Now place the finished bow on top of your ribbon trim at the meeting point to conceal it, and sew in place.


We just have to do the waistband and it will be done! Fold over and press about 1/4 of an inch, and then fold that over again about an inch (just make sure whatever width elastic you are using will fit easily inside the casing you are making), and press and pin down.


Sew along the bottom of the edge, leaving about a 1.5" opening to thread the elastic threw. Now you need to know your child's waist circumference. Cut a piece of elastic about one inch smaller than their waist, attach a safety pin to one end and thread it threw the casing.


Over-lap both ends of the elastic once threaded completely.

Sew the ends together.


Top stitch that elastic opening closed, and........


You're Done!!

I love this skirt! I plan on knitting a bell sleeve cardigan to go with it. Start to finish this took me about an hour. It should have taken much less, but I was having sewing machine issues the day I made it. And, if you decide to leave the ribbon off, I bet it wouldn't take more than 15-20 minutes tops. And... I have enough of this case leftover to make a matching headband (I'll post that another day)! Plus another pillow case exactly like it to use on an entirely different project! Yes, I am aware just how dorky I can be, I'm ok with it :)

Let me know if you make one of your own and how it turns out.

If you have any questions, just leave a comment below and I'll answer it as soon as I can.
Take Care!


Sunday, September 5

Quick & Easy Honey Mustard Dressing


Another one of my favorite dressings! I think I just like dressing, lol. This is a great topper for salads, but also tastes great spread on a sandwich, maybe turkey. Either way, it's just plain good, and only takes about 2 minutes to make - yum!


What you need:
1/2 C Mayo (you can substitute plain yogurt to lower the fat if you want)
1/4 C Honey (we use a local brand produced just 15 minutes away - it's sooo good!)
1 Tbsp Dijon Mustard
1/8 tsp onion powder
1/8 tsp garlic powder
1/8 tsp mustard powder
1) Combine ingredients, whisk together and enjoy!

Take Care!

Saturday, September 4

Homemade Ravioli

I was playing around in the kitchen the other day, and decided to try and make some ravioli. I have no idea what the "proper" way to make ravioli is, but I was happy with my outcome, and so was the rest of my family, so here is what I did...


I rolled out some pasta sheets using this noodle recipe, and then cut them into small squares about 2"x 2".

For the filling, I mixed one small container of Ricotta cheese with two handfuls of shredded mozzarella (about 1 cup) and a half a cup of Parmigiano Reggiano.

I placed a very small amount of the mixture in the center of the squares.

Covered that with another noodle square and pressed the edges shut with the end of a fork.

Make sure the edges are completely sealed, otherwise your mixture can ooze out while the noodles are boiling.

Add the ravioli to boiling water with a dab of oil added to the water to prevent sticking. It took them about 5-6 minutes to cook. They are done when they all float to the top. Drain and enjoy!


YUM!!
I should add that using the noodle recipe I had enough to make two batches of ravioli, and extra filling left over after that. This meal really costs pennies to make if you think of all the dinners you get from one mixture. I froze the second batch. If you freeze some, put them in the freezer separated on a cookie sheet covered in parchment, and then toss in a bag once frozen. This will prevent them from sticking to each other.
With the leftover mixture, I made some extra noodle sheets and rolled up some mannicotti and froze that for quick lunches. I'll post that method in a few days.

Enjoy!


Friday, September 3

Say Hello to Jack Skellington - sort of...


Austin has a passion for all things scary.

If it were up to him, Halloween would be an every weekend event. So the other day when we came across this pattern on a winter hat search, he started bouncing up and down and insisted we get started on it right away! Unfortunately it's too big for him, so we passed it along to another fan of scary stuff... Hopefully it fits!

You can find the pattern here. Even if you have no intention of creating the hat, please please take a look at the pattern, the photos of the finished hat on (when it fits correctly, lol) are so stinkin' cool! I'm not sure if I can copy and paste the photos here, so really, go take a look. I found it on Knitty (love that site!), and it was designed by Saskia and you can visit her blog here.

I have every intention of making another hat, but in a smaller version to fit my little guy.

Take Care!

Thursday, September 2

Free Beginner's Workout Program from a Personal Trainer


Most of you probably don't know that I'm a certified personal trainer. I don't talk about it much here because it doesn't fit my original theme. It is a huge part of my life though, so here we go...

My credentials - because you should always know where your advice is coming from, not because I want to toot my own horn :)

-
I'm certified by the American College of Sports Medicine (A.C.S.M.). They have one of most difficult certification programs in the country, and have set the precedent for all other certification programs.
- I have completed college courses in the following subjects: Exercise Physiology, Kinesiology, Anatomy, Program prescription and design, Strength Training, Nutrition for Wellness, Contemporary Health Issues and Exercise Science. This is not all of the courses taken, however they are the most relevant.
- I have experience in sports camp, speed and agility training, running programs, special population programs, and individual apparently healthy programs.
- I am current on my First Aid, CPR and AED training.
This is a very basic, bare bones workout for a beginner. A beginner is classified as someone who has not worked out on a regular basis for more than 6 months. This work out is also ONLY for people classified as "Apparently Healthy" and who do not smoke.

**Disclaimer**
As with any new workout, consult a doctor prior to taking up any new physical activity. Should you choose to follow this work out, I will not be held liable for any outcomes that may occur - positive or negative. By following this workout, you assume all responsibility.

Now on to the fun stuff!

About a week ago, my mom came to me, asking for a fitness routine. I thought if I also posted it on here for everyone else, it might help keep her motivated. I've actually had quite a few requests for a beginner's work out, so maybe everyone could help keep each other motivated by leaving comments on your progress below.

Obviously this won't work for everyone, but if your fitness needs match my moms, and you fit the apparently healthy description, than I say go for it!
My mom's fitness requests:
- A beginner's program - inactive for more than 6 months
- 3 workouts a week to start
- No time limits - that makes my job easy! Thanks mom ;)
- Total body shaping
- Fat loss

A good program will involve changes at least every 4-6 weeks, to keep your body guessing, and progressing. So stay tuned for workout updates!
The following workout is designed to be done either at a gym or at home if you have the equipment necessary. I would suggest going to the gym though in case you have any questions, this way a professional will be able to answer them for you.

Make sure to have at least one off day between each workout. For example, you don't want to do Workout 1 on Monday and then Workout 2 on Tuesday. Maybe shoot for a Mon., Wed., Fri. routine - but really, it's all about what works best for you.
For the first week, only do 25 minutes of cardio, then bump it up to 35 minutes for the following 5 weeks.
**Cardio effort is based on RPE (Rate of Perceived Exertion), from a scale of 1 to 10, 1 being super easy and 10 feeling like you're going to pass out - never go to 10!**
Workout (day 1 - hard cardio effort, day 2 - easy cardio effort, day 3 medium cardio effort)
5 minutes of light cardio to warm up
25 minutes of cardio (do anything that gets your heart rate up to the effort of the day, and is enjoyable - elliptical, treadmill, bike riding, speed walking and dancing are all examples).
3 Minute Cool Down
Weight Training (see below)
5 Minutes of Static Stretching
Bicep Curls - 10-12 each arm
Tricep extensions - 10-12
Fly - 10-12
Bent Over Row - 10-12 each arm
Fly - 10-12
Bent Over Row - 10-12 each arm
Front Raise - 10-12
Front Raise - 10-12
Rear Lat Raise - 10-12
Lunge - 10-12 each leg - no weights
Ballet Squat - 10-12 - no weights
Straight Leg Deadlift - 10-12
Oblique Crunches - 10 each side
Crunches on Stability ball - 15
Oblique Crunches - 10 each side
What's nice about this workout is that you don't need to rest between each lifting exercise. This is because you are working antagonist muscle groups, which means that while you are working one, the the opposite one is at rest. This ups the calorie burn, and cuts down on a lot of time. I hate wasted time, lol.
Each exercise name is also linked to a website called http://www.exrx.net/ that will show you how to preform each move. Proper form is key when it comes to seeing results. So many people lift weights that are too heavy to carry out the movement correctly and end up either getting injured, or they don't get the results they want. Always remember to keep your movements at a very controlled pace so that the weight is not being lifted by momentum. You want your body to do the work, not gravity.
Let me know how you do and have fun, that's the most important part!

Wednesday, September 1

Austin's G.I. Joe Insulated Lunch Bag


I think maybe I'd rather call this the "Monet Bag". From a few feet away, it looks kinda cool. Walk closer, and oh dear... I am quite the beginner sewer, there's no question about that. For some bizarre reason I figured when I bought One Yard Wonders, a book with 101 projects that use 1 yard of fabric or less, it would be filled with all beginner's patterns. Must be a beginner's train of thought, lol. The book itself is great, and a steal at less than $20 for 101 patterns. There a ton of projects that I can't wait to try!
The really cool part about this bag though, is that it's made with insulated batting. I had no clue what that was until I attempted this project. It's pretty neat, and it just happened to be 40% off the day I bought it - lucky me!
So, aside from the fact that I had to wrestle with my sewing machine, and jam layers upon layers of bulk under the presser foot (at one point I thought I broke the machine), I'd say this was a good humbling lesson for me. I have finally realized that it might actually help to walk before I run with new hobbies (hmmmm, what a strange idea....). But most importantly, Austin has a brand new lunch bag, custom made to his specifics. And I have piles of insulated batting to play with ;)
Take Care!
~Lisa