Monday, October 1

Baby Bean Turns One!

 
Earlier in September, our little Stella turned one. We had a small celebration with just the five of us on her actual birthday. The family party was yesterday and I feel safe saying little Stella had a fabulous day - as did the rest of us.
 

Since you only turn one once, and I'm certain Lil' Stell will always be our youngest, I wanted to go a little above and beyond. I don't normally get all matchy-matchy and party decor crazy. The picture you see above... It may not look like much to those of you who have experience in the party planning department. But that's a big to-do in my world. And you know what? I loved every minute of creating it! The best part?? 90% of it was either printed out at home or free! Yay!


I found these incredibly cute owl themed printables here. Everything from cupcake toppers, to "Thank Whoo!" tags, to invitations is there - free to print out at home.


Chris and I went on a "perfect cupcake" quest that involved well over 150 cupcakes, 10 pounds of powdered sugar (oy!), a heck of a lotta butter and some really happy "experiment" taste-testers. We landed with a hands down, ultimate favorite - these carrot cake cupcakes are The. Best. Ever! I have never been a big fan of chocolate cake, so Chris had the final say in that category - his pick? These dark chocolate cupcakes - minus the filling, from Java Cupcakes. I really don't like chocolate cake at all, but these were delicious!


I tried my hand at a mini candy bar, and homemade chocolate owls. I think the molds for those and the striped paper straws were my only splurges. I painted the ends of large dollar store spoons to give them the color dip look. Next time I will make sure to print on the food labels to give everything a more polished look. My cupcake stands are just empty boxes wrapped in coordinating colors, with ribbon taped to the edges.


This is one of my favorites. I found this frame at our local thrift store for a dollar. It had already been distressed the way I wanted it - lucky me! I glued twine to the back, and using Picasa, I quickly converted a handful of photos into Polaroids. These are a small blurb of Stell's first year.


My happy little girl with her very own cupcake.


She was more interested in standing on her presents, than opening them. I guess that's what big sister's are there for. Miss Hannah was more than happy to help unwrap.
 
Thanks for stopping by!
 
Wishing you all a wonderful start to your week!
-Lisa

Saturday, September 1

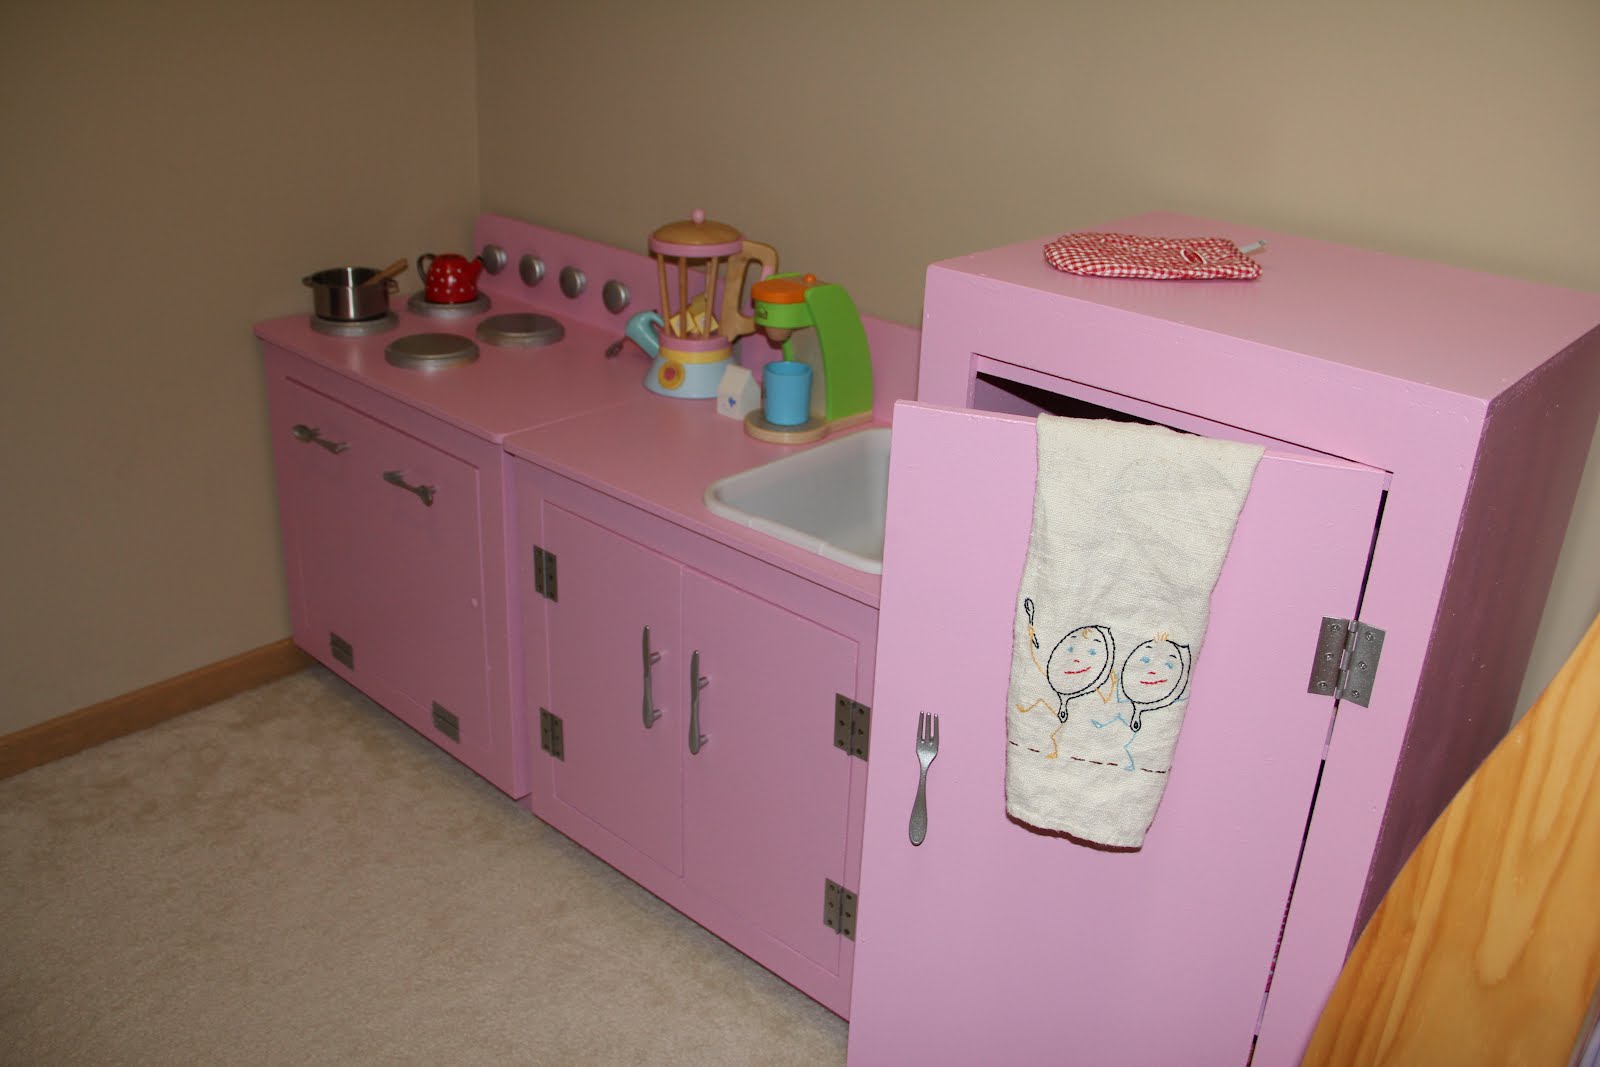
Play Kitchen Update


A very, very long time ago, I posted about an awesome garage sale trip. The best one ever actually. At one house I found everything I had on my searching for list - and at crazy good prices. I showed all of you the cute little table and chairs for the girls' room. I sanded that down and painted the tops a light purple. I also scored an adorable pint-sized white rocking chair so Hannah could rock her babies while I rocked Stella (who was still in my tummy at that time - see I said it was a long time ago). What I did not show you was this awesome kitchen set.
Hannah and I feel in love!
It didn't look like this when we bought it though, so I waited to show it off.


This is the original set.
 
From the picture here, it doesn't look too bad, but in real life it was pretty grimy. I had to scrub everything down with magic erasers and soapy towels. We scraped off the weird foamy black circles on top of the stove too.


Here are some close ups of the finished kitchen. After procrastinating for about a year, I finally chose a paint color and went to town. The project ended up taking me close to a month to finish because of sick kids and a cranky teething baby - but it was well worth it!


Chris removed all of the hardware for me so that it could be spray painted a metallic silver. We replaced the foamy stove burners with wooden circles I found at JoAnn's. The color scheme came from some Pottery Barn inspiration seen below.

I found these super cute pink knobs at Hobby Lobby.


Overall I'm really happy with the kitchen. It has TONS of storage for toys too - which is awesome for our tiny play area. It's still a work in progress. I want to add an Ikea towel bar and paint the inside of the fridge door with chalk board paint. It could use a few decorative touches here or there as well.
 
 I finally felt like it was worth sharing at this point
 
I'll share updates when they're finished.
 
I hope everyone has a fun and safe long weekend!
-Lisa

Wednesday, August 8

Organization On a Budget - DIY Daily System

source

For about the last year or so, I have had my eye on Pottery Barn's Daily System (shown above). Unfortunately for me, I can't quite bring myself to cough up the money for this amazing system. For all the parts - yes, it is purchased in parts - that I want, would have me spending upwards of $200. I'm all for organization that is both attractive and functional - but I'm not down with dropping all my cash for that perk.

Which brings me to my first project to share!

It's not perfect or completely finished - but I couldn't hold back my excitement about my project any longer. I just had to share. So far I have invested a total $23 into my system and I'm pretty excited about that. In all fairness, I did have the giant sized cork board going unused in my basement already - as well as the paint - so I'm not including those in my total spent. You can find a cork board this size at discount stores for around $5-10 - still not a bad deal.
Here is what I did...
I have been wanting to do something with is awkward wall of mine since moving in 8 years ago (true story! Eight years and no ideas on my end). You can't see in the pictures, but there is only about 3 feet of walking space between that wall and another wall as well as the door to our basement. Nothing ever seemed to work. When I fell in love with the Daily System from Pottery Barn, Chris and I agreed that it would be a perfect fit for that wall. But neither one of us had any intention of actually buying the system - again - budget issues. So the wall remained empty and my fridge remained covered in papers.
Until.... A light bulb went off in my head and a realized I could use that old cork board and paint it the color of my walls with our tub of touch up paint! I ran right out into the garage and started painting. I decided to tape off the cork and paint the trim of the board white to add some contrast. Easy peasy. The whole painting part was finished in 30 minutes, start to finish.
Then I went on a search for hanging pocket folders that would mimic the style of the Daily Systems folders. It took a while but I finally found these!


source

They were perfect! And at $9 a piece, worth it in my mind. They are heavy duty, match beautifully and work like a charm. I did have to attach them to the cork board with my glue gun because the adhesive backing was not sticky at all. You can also just use the giant push pins that come with it, but they are huge and sharp and I really don't want one of my children to accidentally come in contact with one of those ginormous sharp pins.


I found simple and easy to attach tiny command hooks for a key holder. This came about right when we "lost" our second set of keys. I think that helped drive home the importance of having a place for said keys so that didn't happen again in the future. Thankfully two weeks later the lost set magically appeared inside the pocket of a pink stroller. Hmmmnnn... Did I mention this is out of reach for the smaller people in our house?

This is in a high traffic area of our house, so we decided to drill it to the wall. I just painted over the screws.


When I finally get around to buying more ink for my printer, I will type out the labels to give this a nicer appearance. I'm also on the search for a pretty calendar and a way to hold pens to the board so I don't have to keep walking to the other side of the wall for them.

 All in all, I'm thrilled with this simple little system. My refrigerator is cleared off and looks awesome blank - my mom actually thought we bought a new one! It's amazing what a clear fridge does for the appearance of a kitchen. I also love that now all the paper work I need for each child is easy to find at a moments notice. When Stella starts school, I will just simply attach one more folder to the board.

Have a great day!
-Lisa


Monday, August 6

Did You Notice?


I took a summer hiatus.

First and foremost, I want to say thank you for still stopping by here! I am amazed at the amount of traffic this blog has had - even without activity on my end. I am hoping that the combination of school and baby napping will allow some regular posting.

 We have had a busier summer than I had anticipated. The funny part though, is that I can't really tell you exactly what consumed so much time - but in the blink of an eye, here we are, gearing up for school again. This upcoming school year is a big deal in our house. Miss Hannah will be in class five days a week - for the first time. I don't think I've mentioned this on the blog before, but our children are a part of a dual language program. The children spend half their day learning in English and the other half in Spanish. Prior to Austin starting the program, no one in our house spoke a word of Spanish. We (Chris and I) are learning slowly, however Austin, who will be entering second grade this year, can carry on simple conversations fluently. It's amazing! They will stay in this program until 8th grade and then they can choose to continue on into high school if they want. This year is the first time dual language is being offered to preschool children and 90% of the day is in Spanish - so it's going to be a big adjustment and I'm really hoping Hannah transitions well.

In an effort to prep for the upcoming busy mornings and evenings, as well as multiple piles of paperwork, artwork and projects, I have been organizing, baking and cooking like crazy. Some of which I am excited to share with all of you and will do so over the rest of this week.

Are you doing anything to get ready for the school year? Do you have any time saving tips or ideas to share? Please do!

Happy Monday!
Lisa

Wednesday, May 16

Lavender Infused Wine


A while back, while flipping threw a Martha Stewart magazine, I came across rose infused wine. I was instantly captivated. Ooh did I want to try it, but, of course the bottle was priced around $60. Ummm, no thank you. I think at that price point, it just wouldn't taste that great to me, no matter how good it was.
It did get me thinking though. I've made infused lemonades before with easy success. So who's to say it couldn't be done with wine? I did a quick Google search and came up close to empty handed, which not only surprised me, but also left me a little wary about trying it.
My solution? Try making just one glass first to see if it works - easy peasy.

With one of my durable little mason jars in hand, I quickly set to work. To my surprise, it was wonderful! Not something to make regularly, but definitely great to try - especially with a themed spring or summer gathering. Yum!

Please make sure that when you make this, you use culinary flowers. I get mine from Mountain Rose Herbs because it's a source I can not only trust but also respect. I'm sure you don't want to be sipping on pesticides, so again, please check that your source (if you don't use mine), is organic.

Lavender Infused Wine1 Bottle of sweet white wine (I recommend either a Riesling or Muscato)
4.5 tsp of dried organic lavender
Cheese cloth or Fine mesh strainer
Small Funnel

1. Uncork your bottle of wine and pour a small amount out to make room for your flowers.

2. Using a funnel, pour in your flowers.

3. Re-cork and place in the refrigerator for 24 hours.

4. After about 12 hours, give the bottle a little swirl and put back in the refrigerator.

5. Pour your now infused wine threw either cheese cloth or a fine mesh strainer and into a wine glass. If small bits of lavender won't bother you, then just use the strainer - otherwise you'll need the cheese cloth to ensure you don't have little bits floating in your glass.

That's it! If you don't want to commit to a full bottle at first, just pour 6 ounces into a mason jar, add 1 tsp of lavender and then follow the same directions listed above.

I will be ordering organic rose petals soon to finally try that. And I won't be shelling out $60.

Have a great day!

Friday, May 4

Spiced Coffee


There's a popular breakfast restaurant in our area that has the most delicious coffee. It's not a sugar laden froo-froo drink (though those most definitely have their time and their place), but a warm, subtly flavored rich brew. I love that coffee, and always look forward to our rare visits there because of it.

Well, my friends, I happened across a rather simple tip to enhance your home brewed coffee the other day and thought I'd give it a try. Imagine my surprise when I took that first sip and realized, my goodness, it's almost the same taste as my favorite, and rarely rarely visited breakfast house coffee.

I tinkered with it a bit, and am proud to say I found the perfect ratio (well, perfect to me anyway).

So here it, simple as can be and oh so yummy...

Spiced Coffee
Unflavored Coffee
1 Tbsp Ground Cinnamon
1/4 tsp Ground nutmeg

These measurements are based on a full 12 cup coffee pot. If you're using a smaller pot or a single brew type machine, just divide it out and it should work.

1) Place your coffee grounds in the filter, then sprinkle the cinnamon and nutmeg on top of the grounds. Brew as usual.

Enjoy!

Thursday, April 26

Homemade Throat Lozenges


For the last few weeks, a cold has been slowly sneaking from one tiny body to the next, and has ended with me. It always seems to work that way, doesn't it? As soon as your little ones start feeling better and are back to bouncing around the room, the virus smacks you in the face. As if to say "haha, no rest for you!" - yes my colds are out to get me - the few times a year they show up.

I typically don't take anything when I get sick, because I'm never "that" bad. But with my recent fascination with holistic/natural health, I thought I would give something a try. I came across a recipe in the book, The Rhythm of Family by Amanda Blake Soule - Homemade throat lozenges by Amy Karol. Amy has her own blog that you can check out here.

So, armed with herbal tea, honey and organic powdered slippery elm, I set to work on making my own natural throat soothers.

Difficult?
No. Do they work? Yes, they actually do help. Not like the in your face menthol blasts you find in the store, but they are soothing both to my throat and my peace of mind. Would I give them to my kids? Why sure! Though the odds of my little ones spitting them out with wrinkled noses is high. These don't taste bad, however, they don't taste like much of anything and the texture takes some getting used to.

Overall, I deem this a natural remedy success. I'm happy with the outcome, and this one little recipe made over 60 lozenges that should last for quite some time.

Tuesday, April 24

Catch Up

Wow, it has been so long...

I thought it would be nice to do a quick catch up with photos from the last couple months. I stopped the photo 365 thing. Life happened, as it so often does, and I lost track of a few projects. I decided to just let it go - no sense in getting worked up over the little stuff. I may pick up where I left off and just do it in my own way - though it might take me three years, eh emm...


Anyway, back to the pictures. What better way to start than my obviously annoyed seven year old? He's not such a fan of the camera lately - though that is not about to stop me. He took second place in the pinewood derby a while back, which put him in the running for the "big" derby up north. We had a good time, and in the end, he won 4 out of 5 races.


We have been having lots of "firsts" around here lately too. Stella loved her first Easter and not more than three days later, cut her first two teeth, started sitting up all on her own, and started scooting around the room. My little overachiever - she looks kind of like a sea turtle propelling herself across the carpet with her little feet.
We had a few egg hunts as well...


And a lot of regular days...

Miss Hannah had her first haircut - at three years old! She absolutely loved her trip to the "beauty salon".


All in all, there has just been a lot of life being lived, and not a lot of pictures being snapped. I do have some fun recipes and tutorials to share with you all. I'm really excited about them, so hopefully it won't take me too long to post. I have also been working on a much bigger project that I will definitely be posting about within the next month or so.


Wishing you a wonderful week!