Sunday, July 23

Easiest Way to Find Tomato Hornworms


Want to know the easiest and fastest way to find every Tomato Hornworm in your garden? Read on...

If you have a garden and you grow tomatoes or peppers, chances are, you've encountered the hornworm. You probably also know just how frustrating these guys can be, devouring your whole plant in a matter of what feels like hours (it's probably longer than that, but with a little nibble here and a little nibble there, they will ruin the whole plant fairly quickly).

I refuse to use any sort of pesticide in our garden - to me that defeats the purpose of growing your own. So, aside from the Neem Oil mixture, I'm left hand picking these huge dudes off my tomatoes and peppers. Which would be fine, if I could actually see them. Truly, I don't know if I dislike them because of the damage they do, or because it's almost impossible to find them all. They have achieved an ultimate level of camouflage, that's for sure.

Until now that is.

Chris and I were talking about the garden one night after the kids were in bed and we were having a little pity party over our eaten up plants. I've been nursing these plants for six months now, they're like little babies. It's really hard to watch all your hard work get destroyed in a matter of days and not feel like you can do anything about it. All of a sudden his eyes lit up and he said "I think they glow! Let's buy a black light flashlight and try it out." I looked at him all dumbfounded and said "They make black light flashlights????"

Guess what? They do! They glow and yes, they make black light flashlights. You can buy one here.

Once it's dark out, just walk outside and shine your little flashlight over your plants. The hornworms pop out like neon. Seriously, it's like an 80's flashback garden party.


In the last 5 days, Chris and I have removed 23 hornworms using this method. We are finding them when they are super small right now too, which was impossible before.

Now go buy yourself a flashlight and go Hornworm hunting - you'll thank me later, trust me.

Friday, July 14

How to Get Rid of Japanese Beetles


** This is a super easy way to get rid of thousands of Japanese Beetles quickly and without having to spray pesticides. **


If you have any kind of fruit or berry bush, I'm sure you know exactly how frustrating Japanese Beetles are. They come in swarms and devour plants until there is nothing but a skeletal structure left. Last year I looked all over Pintrest for different recipes to protect our blackberries and fruit trees. I found one mixture that worked well, but had to be applied pretty much daily to keep these gross little pests away. I also happened to pull a bunch of ligaments in my foot trying to avoid a swarm of them after spaying. Wet grass and slick shoes don't mix my friends.

This year I wanted to try something easier, and a little less hands on with the bugs. Amazon is typically my first go to for products, and I was excited when I found these traps. I ordered two because we have quite a bit of space to cover.


I took this picture right after I hung the bag. I had beetles following me to the post from my front door - this thing works that great.


This was the following morning. I think it's worth noting I set the bag up around 8:30pm the night before. I'm convinced this bag was filled to the brim hours after installing it. Side note, I was gagging while taking this picture and fully utilizing my zoom option on my camera.


Seriously, look at that. It makes my skin crawl, which is problematic because just by looking at this photo, it's pretty clear I needed to either change the bag or come up with another idea.

I went with another idea...


I decided to try hanging a garbage bag over the shepherds hook that the bag was attached to. This worked, until an hour later the bag was so heavy that the drawstring was closing the opening at the top.

A few minutes of motivating self-talk and with the moral support of my older daughter, I was able to poke holes in the top of the bag and attach them to the frame of the trap so the drawstring couldn't close completely. I'm sure we looked crazy. The two of us kept getting close enough to get dive bombed by the bugs, only to yelp and run back to a safe distance. It took a bit, but we did it.


That's a lot of bugs.

These Japanese Beetle traps work really well, so much so, that I would suggest keeping them at least 100 or more feet away from the plants you want to protect. The directions say 30 feet is enough, but I would argue that. To see the exact bags I used, click here.


Here's one of our bell pepper plants. I couldn't bring myself to end a post on a garbage bag full of bugs. A garbage bag I need to go empty at that. Wish me luck...

Wednesday, July 12

Easy Beet Hummus Recipe


** Make this easy beet hummus in just a few minutes - it's so good! **

 It's safe to say I'm the only person in my house who LOVES beets.

My kids could take them or leave them, and my husband won't go near them. That being said, I try not to go crazy planting them. I only have a few left to pull  (more seeds will go in the ground in a couple weeks for a Fall harvest) and this afternoon I realized I hadn't made my favorite beet hummus this summer. The coolest thing about hummus, aside from being delicious, is that you can freeze it. I didn't know that until last year. So now I can make a huge batch of this and freeze portions to enjoy during the winter. This recipe is super simple, all you need is a food processor or high powered blender. I used my Vitamix for this.

**Scroll down for the detailed recipe**


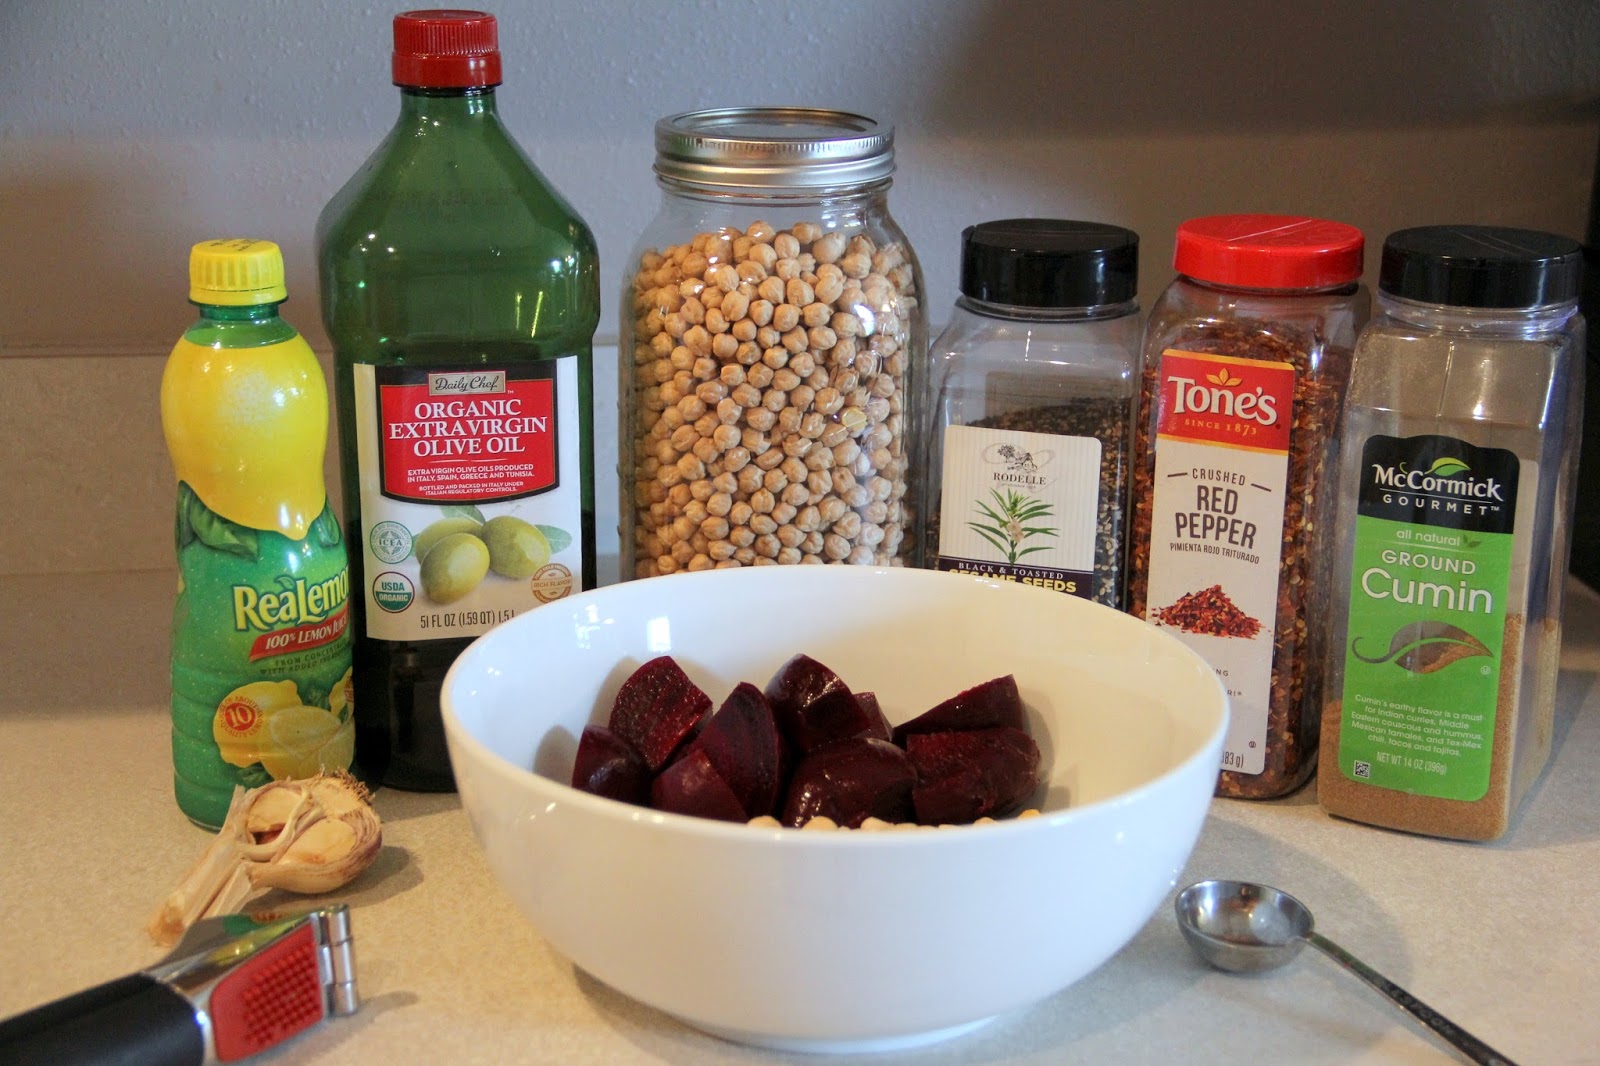
Here's everything you need. I'm a visual person and enjoy seeing process photos, so incase you are too, here you go.


See, I even put everything in a bowl and arranged it to look nice, just for you. Normally I would just toss everything in the blender and go.


My very trepidacious taste tester and hand model.


The fact that she ate this, knowing it had beets in it, and went in for a double-dip makes this a mom win for me. Remember, no one else in my house likes beets...


Here's the best part - you can freeze it! I line a cookie sheet with either this slipat or parchment paper, plop a large spoonful of hummus on it and then put it in the freezer. A couple hours later, just pick them up and put them in a freezer baggie. It's all portioned out, so it won't go to waste if no one else in your house likes beets either. It thaws perfectly in the refrigerator.


Beet Hummus Recipe

3 Cups Garbanzo Beans (or 2 cans)
2 Cloves of Garlic minced
3 Roasted and Cubed Beets
3 TBSP Olive Oil
1/4 C Lemon Juice (about 2 lemons)
1/4 C Toasted Sesame Seeds (or 2 Tbsp Tahini)
3/4 Tsp Cumin
1/2 Tsp Salt
1/4 Tsp Red Pepper Flakes
1/4-1/2 C Warm Water


1) Toss everything in the blender or food processor and pulse until the hummus has a semi-smooth consistency.

2) Slowly pour in the warm water while blending/processing until it is super smooth.

That's it!

Sunday, July 9

Natural Organic Insecticide That Actually Works


**Scroll down to see the recipe for this all natural organic insecticide**


    Last year was our families very first garden. I remember being so excited during the Spring, all of our cold weather crops were ready to harvest and we hardly had a single pest to deal with. The weeds were minimal, and in my inexperience I couldn't help but wonder to myself why everyone made such a big deal about gardening - this was easy!

   Fast forward to late June early July, ummmm hello Japanese Beetles (I tore ligaments in my foot avoiding a swarm of them - seriously), Tomato Horn Worms (I thought it was the cutest thing ever until a friend promptly told me to remove it immediately - by the time I got there, it had devoured three quarters of our banana peppers), Spider Mites (resulting in gross looking sickly tomato plants) and aphids - oh the aphids...

   These garden pests knocked me off my proverbial garden stool pedestal faster than I care to admit. I tried a few different natural things, but ended up  succumbing to the idea that we just wouldn't have huge harvests and I would have to do a lot of the bug removal by hand.

   Over the winter I did a lot of research and came across Neem oil.  Neem oil will repel and manage over 200 different types of garden pests - that's a lot! It is also a fungicide and when applied correctly it will help with root rot, black spot and sooty mold. To read up on this more, click here.

   Once the temperatures started to rise and I knew the bugs were on their way, I whipped up this super simple inexpensive Neem oil solution. I have been applying it about once every 5 days or so, very lightly and while there are still some bugs, for the most part, my plants are growing strong without any issues.

   The best part of all, this is safe for both people and animals. Below you will find the recipe I use. If you click on the highlighted items, it will take you to the actual products I use. I make this in a half gallon mason jar and then use a funnel to transfer it to a spray bottle. This just reduces the amount of times I have to remake the solution.


Natural Organic Insecticide

1 Half Gallon Mason Jar
2 Tsp Cold Pressed Organic Neem Oil
2/3 Tsp Organic Castile Soap
Warm water
Long spoon or something to stir the mixture in the mason jar

1) Fill the half gallon mason jar almost to the top with warm water (the warmth helps integrate the oil and soap).

2) Add the soap to the water first (this matters - otherwise you will end up with a clumpy mess) and mix.

3) Put the long spoon into the water and start stirring, while stirring quickly, add the oil and mix well. After this you can put the lid on the jar and give it a few more vigorous shakes.

4) Using a funnel, add the solution to the spray bottle and then you are good to go.

You will need to shake it up a bit before spaying quite a few times, but it's really easy. As a precaution, it is recommended to test out a section of each plant before applying to everything. In some rare cases, the solution may interact negatively with the plant. I have not had that happen yet, but it's always better to be safe.


** I have recently become an affiliate with Amazon. So if you purchase an item from a link you find here, I will receive a very small percentage of the sale - with no extra charge to you. **


Wednesday, July 5

Homesteading update


 It has been soooo long since my last update, so please bear with me - this will be a long post and full of photos.

Over the last year, we have been working diligently to get our little homestead up and running. I hesitate to call it a homestead at this point, because we still have a very long way to go until we are self-sufficient. That is however, the ultimate goal, and we have to start somewhere, right?  I feel like we've made large strides over the last year, so here is a very condensed update.


We started near the end of Winter by placing a tarp over the area of the garden we wanted to expand.  We let it sit until all the grass underneath had died off. With the grass dead, we tilled the area and then picked out the rocks. I'm not talking pebbles either - look at my little self-professed "Rock Queen" below...


In the future, we now know we should be tilling and adding the soil amendments in the Fall so it has time to decompose. We learn something new all the time - that's part of what I love about gardening. I couldn't keep a plant alive to save my life three years ago, so this is HUGE for me.

We added organic mulch and peat moss to the soil and then raked it all in, doing our best not to trample the freshly tilled soil.


(I love my helpers so much)


A few days after mixing the soil, I went out and made rows of hills and transplanted all 80 (yes I'm hoping to spend days canning away this summer) of our tomato and bell pepper plants. They were started from seeds we had left over from last year. We put red onions, spinach, carrots, beets, basil, peas and string beans out at this point as well. I started late this year and could have had the cold weather crops out sooner - hopefully I stay on the ball next year. We again moved the tarp to kill off more grass.


 Shortly after this, our less than a year old dryer broke (of course it did) and we had to wait a month and a half for the parts and service. Buuuut, hello silver lining (there's always a bright side), this was the exact encouragement my husband needed to build a clothesline. I had been begging since we moved in - so I'm super excited about this.

The plan is to paint it white so it matches the other things we've built (just a little bit of Type A going on in this house).


 Speaking of other things we've my husband has built, here's my older daughter's rabbit hutch. I love it, and so does her rabbit. The free DIY plan came from Rouge Engineer - you can view the original here.


Caramel the rabbit resting in the shade. Don't worry, she gets out on adventures around our house and has a never ending supply of fresh veggies and hay.


Our ladies a.k.a. the chickens, have been laying consistently for months now and bring in about 8 multi-colored eggs a day. They're the goofiest little things to watch and thankfully, so far, have stayed out of the garden.


 They did like to lay in between the garlic plants over the Winter and Spring, but thankfully all the garlic survived and we had a pretty good harvest.


Fresh garlic tastes amazing and is so incredibly easy to grow. You need to try it, I promise you won't be disappointed. We have the garlic curing on a wire shelf in our house right now.


Last week we expanded on our fruit orchard. There are a total of 20 plants - 10 raspberry (multiple varieties) and 10 blueberry (multiple varieties).  Behind the berry patch are 4 pear trees and 5 apple trees - again, in multiple varieties in an effort to increase fruit yields. We only have one single pear out there though. I know I didn't prune them correctly over the winter, so I have some studying to do.


The kids and I were giddy when we found ripe blueberries already attached to the young bushes.


We also added three plum trees, these are next to peach trees we put in last year.


Back to the ever expanding garden. My favorite place here.


We will definitely be using a different layout next year. We want long straight rows and plan to use irrigation tape to keep the soil evenly watered. Right now it's a bit of a hodge-podge of vegetables.


I'm super sad about our strawberry bed. I let it go and it's so crowded out, we only ended up with a small handful of berries. The plan is to drastically thin it out and hope for a better turn out next year.

We will likely add a few more raised beds next year as well.


As far as future projects this year, a chicken tractor is in the works and likely to be finished in a day or so. We plan on raising meat birds this summer. We will hopefully have some sort of hoop house or row covers too.

We have a lot going on, and interesting things to share. I started working out of the house this Winter and haven't had much time to write. I have the summer's off though and plan to update regularly and share recipes and homemade remedies. Please come back and see what our little family has been up to.


One last photo of an amazing sunset.
There is never a shortage of beauty here in the Ozarks, I love it.


Thursday, April 28

Balsamic Roasted Radishes - Recipe


Oh my yum! Really! I'm not much of a radish fan, but when my daughter asked to plant them this year I couldn't say no. Especially because I know they are super easy to grow and it would be so exciting for her to watch her hard work and effort pay off.

She planted the entire package.

Pretty sure every single radish grew.


You can see the small seedlings coming up here. The second bed wasn't even filled yet and we had sprouts of radishes.


This is our second harvest. The first she ate right at the garden bed after spraying them down with the hose. There's no way I would tell my kid not to eat a vegetable, even if it still had some dirt on it. If you look below the radish bunch to the right, you can see our spinach almost ready to go. It really is so exciting!


 Just for fun, here's my youngest doing her garden work. She's such a trooper. Always wanting to help and do whatever her momma is doing. I love having the help too!

Ok, on to the actual recipe...


Balsamic Roasted Radishes
1 Bunch of Fresh Radishes
1 tsp Coconut Oil
3 Tbsp Balsamic Vinegar
Salt & Pepper to taste

1) Set oven to 450. If using a cast iron skillet, grease it with the coconut oil and place in the oven to warm up.

2) Cut off the root tips and discard (or feed it to your chickens like we did). Cut off the tops and set aside for later.

3) Halve or quarter each radish and put in a large bowl. Add balsamic vinegar to the bowl along with a few dashes of salt and pepper.

4) Mix everything together until the radishes have all been coated with balsamic. Place in a cast iron skillet or roasting pan and cook for 10 minutes, stirring occasionally.

5) After 10 minutes, add the radish tops to the skillet or pan and continue to roast for another 5 minutes, making sure to move them around at least once during that time.

Remove from the oven and enjoy!


Wednesday, April 27

The Best Blueberry Lemonade Recipe


At least once a week, I find myself in the kitchen mixing up something new. It usually involves soon to expire something or another. I'll be honest, most of my kitchen experimentation turns out to be a flop. My family is so good about it though and continues to try my "new recipes" in hopes the next one will actually taste good. Really, it makes me love them even more.


So, that being said, my youngest took the first taste test and declared it amazing and then asked to eat the mushed up blueberries. Ha! Fair enough. When my older two came home from school, they were all over it and insisted I needed to patent the recipe. Wow, huh? So even though lemonade is pretty hard to mess up, I'll take this one as a win in my book and go out on a limb and call it the best blueberry lemonade recipe. It's super easy to make, only takes a couple minutes, tastes amazing and in our case is almost completely organic.

Try it out and let me know what you think!

What you need:
Quart size mason jar (or other container of that size)
Small Pot
Fork or Spoon
Mesh Strainer
1/4 Cup Sugar (sub Honey and cut amount in half - or use stevia to taste to make it sugar free)
1/2 Cup Lemon Juice
1/2 Cup Frozen Blueberries
1 Cup Warm Filtered Water
1 3/4 Cold Filtered Water


1. Warm up your 1 cup of water in the pot on the stove. Dissolve sugar completely in the warm water.

2. Once the sugar has dissolved, add the lemon juice, stir, then add the cold water and stir again. Taste test at this point to see if it is tart enough to your liking or the sweetness needs to be adjusted.

3. Add frozen blueberries to your mixture and allow to sit for a few minutes until they thaw completely.

4. Using spoon or fork, mash the blueberries up against the side of the pot. Once the have all been smashed, stir again and let sit for at least 10 minutes in the fridge to let the flavors blend.

5. Place the mesh strainer on top of the quart sized container and pour the liquid from the pot into the container. All of the blueberry pieces should be caught in the strainer. Discard (or eat - they taste good).

That's it! It's sounds more complicated than it really is.

Don't want to miss a post? Sign up with your email and get them delivered to you.

Take care!
Lisa

Tuesday, April 26

DIY Chicken Coop


(Ignore this weird box... not sure what happened, lol)


Ack!!! We finally got our chickens :) We've been waiting for this moment for years, so naturally, it was the first project we took on. It's also the very first woodworking project we ever even tried. Sooo, while I know the construction probably isn't perfect, I could totally care less. It functions just the way it should and it's cute. I love this little coop we made and I'm proud too :) I've included the link to the free plans we used below.


 First, can I just say - look at those cute little baby chicks! We brought home 10 of these little stinkers. They were cute little balls of fluff for about 30 seconds. Seriously, there's a reason everyone who owns chickens tells you to have the coop finished before you buy the chicks. They didn't last long in our bathtub (yes you read that right). We were in a mad dash to finish up building before these little cutie pies outgrew their home. Which they did. Multiple times. Thankfully we were able to improvise enough along the way so they were always comfortable and had enough space until it was warm enough to move them outside.


Below are a few progress pictures of our coop.

All framed and ready for walls...


Walls up and ready for paint and trim.


 We have the cutest little helper, with shoes on the wrong feet and still in pj's at 2pm...


Framing out the run.


 We modified the run by making it a little 5.5 feet tall - high enough for me to walk in without having to hunch over. We wanted the birds to have plenty of room to stretch their wings too. We let them free range while supervised, but otherwise they need to stay in their run because of predators.


We cut out a door with a latch for the chickens to get from their coop to their run. We also made little inserts to put in the windows for potential nasty storms.


The kids love to be with the chickens. They are an endless stream of entertainment for us, those goofy little birds.


Up close with Flight


Here's the link to the plans we followed, with some improvising along the way to suit our needs.


Thanks for stopping by! Be sure to sign up with your email you never miss a post.

- Lisa