Welcome Back!
Today I wanted to share my homemade taco seasoning recipe with everyone. The store bought versions contain starches, citric acid, maltodextrin, and a bunch of other unnecessary junk. This recipe is the best I've found so far and it tastes amazing - so much better than the pre-made mixes. You can quadruple the recipe and store it in an air tight container for future use. We use about 2 tablespoons per pound of meat.
What you need:
2 Tbsp Chili Powder
1/2 tsp Garlic Powder
1/2 tsp Onion Powder
1/8 tsp Cayenne Pepper
1/2 tsp Oregano
1 tsp paprika
3 tsp Ground Cumin
2 tsp Sea Salt
2 tsp Black Pepper
1.) Combine all ingredients with a whisk and store in an air tight container.
That's it!

Wednesday, June 30
Tuesday, June 29
DIY No Sew Tutu
 Welcome Back! Or shall I say "I'm Back!"
At least for a bit anyway, lol. I wanted to share this super easy and adorable project - it took about 30 minutes start to finish, and ended up sooo cute! My daughter absolutely loves this.
Here's the link to the tutorial I followed to make this tutu.
To get this Forth of July design, I used blue satin ribbon and the color rotation went: 4 white, 4 red, 4 white, 4 blue, repeat....I'm pairing this tutu with white legging shorts, red sparkle mary janes from Target, a white tank embellished with homemade boutique bows, and a matching hair bow. Oh, and this is for my 2 year old, not me, lol.
Wednesday, May 26
Homemade Pizza Dough
 Welcome Back!
Pizza dough is one of the easiest yeast breads to prepare, and is a great starting point for beginners. I use this recipe to make our pizza's as well as bread sticks. I usually make four batches at once, and freeze the leftover three. If you do this, make sure to open the container or bag that the frozen dough is in while it's thawing, otherwise it might burst (I know this from personal experience). I also soak the wheat flour overnight in an acid medium to help break down the phytates. Doing this creates a soft dough similar to using white flour, and helps aid in digestion - allowing more vitamins and minerals to be absorbed into the body. I do a separate post on soaking soon.
What you need:
1 Pkg active dry yeast (2.5 tsp)
1 C warm water (110-115 degrees - should feel slightly warm to the touch, but not hot)
2 C Flour (I use a mixture of whole wheat and spelt) + up to 2/3 C
2 Tbsp Olive Oil
1 Tsp Salt
2 Tsp Sugar
1. Dissolve yeast in warm water for 10 minutes, or until it gets super bubbly and frothy (this is called proofing)
2. Combine all ingredients and knead until the dough is very elastic, not stiff. You will probably need to add a bit more flour while kneading - you want the dough to be tacky, but not so sticky that it won't come off your hand.
3. Place dough in an oiled bowl, cover with a towel and put in a warm place. Let rise for 30 minutes, or until doubled in size.
4. Roll out to desired shape and size, and cook at 350 degrees for 20 minutes or until slightly browned.
Tuesday, May 25
Searching For Clovers
 Welcome Back!
Today was absolutely beautiful out, and the inside of the house was not the place to be. We spent the majority of the day outside playing, and ended the great day with a walk near dusk. Our mission? To find the infamous four leafed clover... We never found one, but the kids had a great time in the process. We came across an ant colony, touched the different textures of grass, had a few bird sightings and counted the sidewalk blocks. This is a great exploring activity and serves as a good opportunity to teach your kids about nature.
What you need:
comfy shoes
1. Decide what it is you'd like to go on a search for. Some examples would include our clover idea, or maybe a robin's egg, colored rocks, and so on.
2. Point out different things that you see around you, the smells, the sounds. Ask your children to do the same for you - you'd be amazed at some of the things those tiny eyes catch that you would otherwise never notice.
That's it really, just make sure to have a good chunk of time set aside to do this - everything is amazing to a young mind and you don't want to have to rush them along.
Take care everyone!
~Lisa
Wednesday, May 19
Cardboard Fun! Uses for packaging inserts
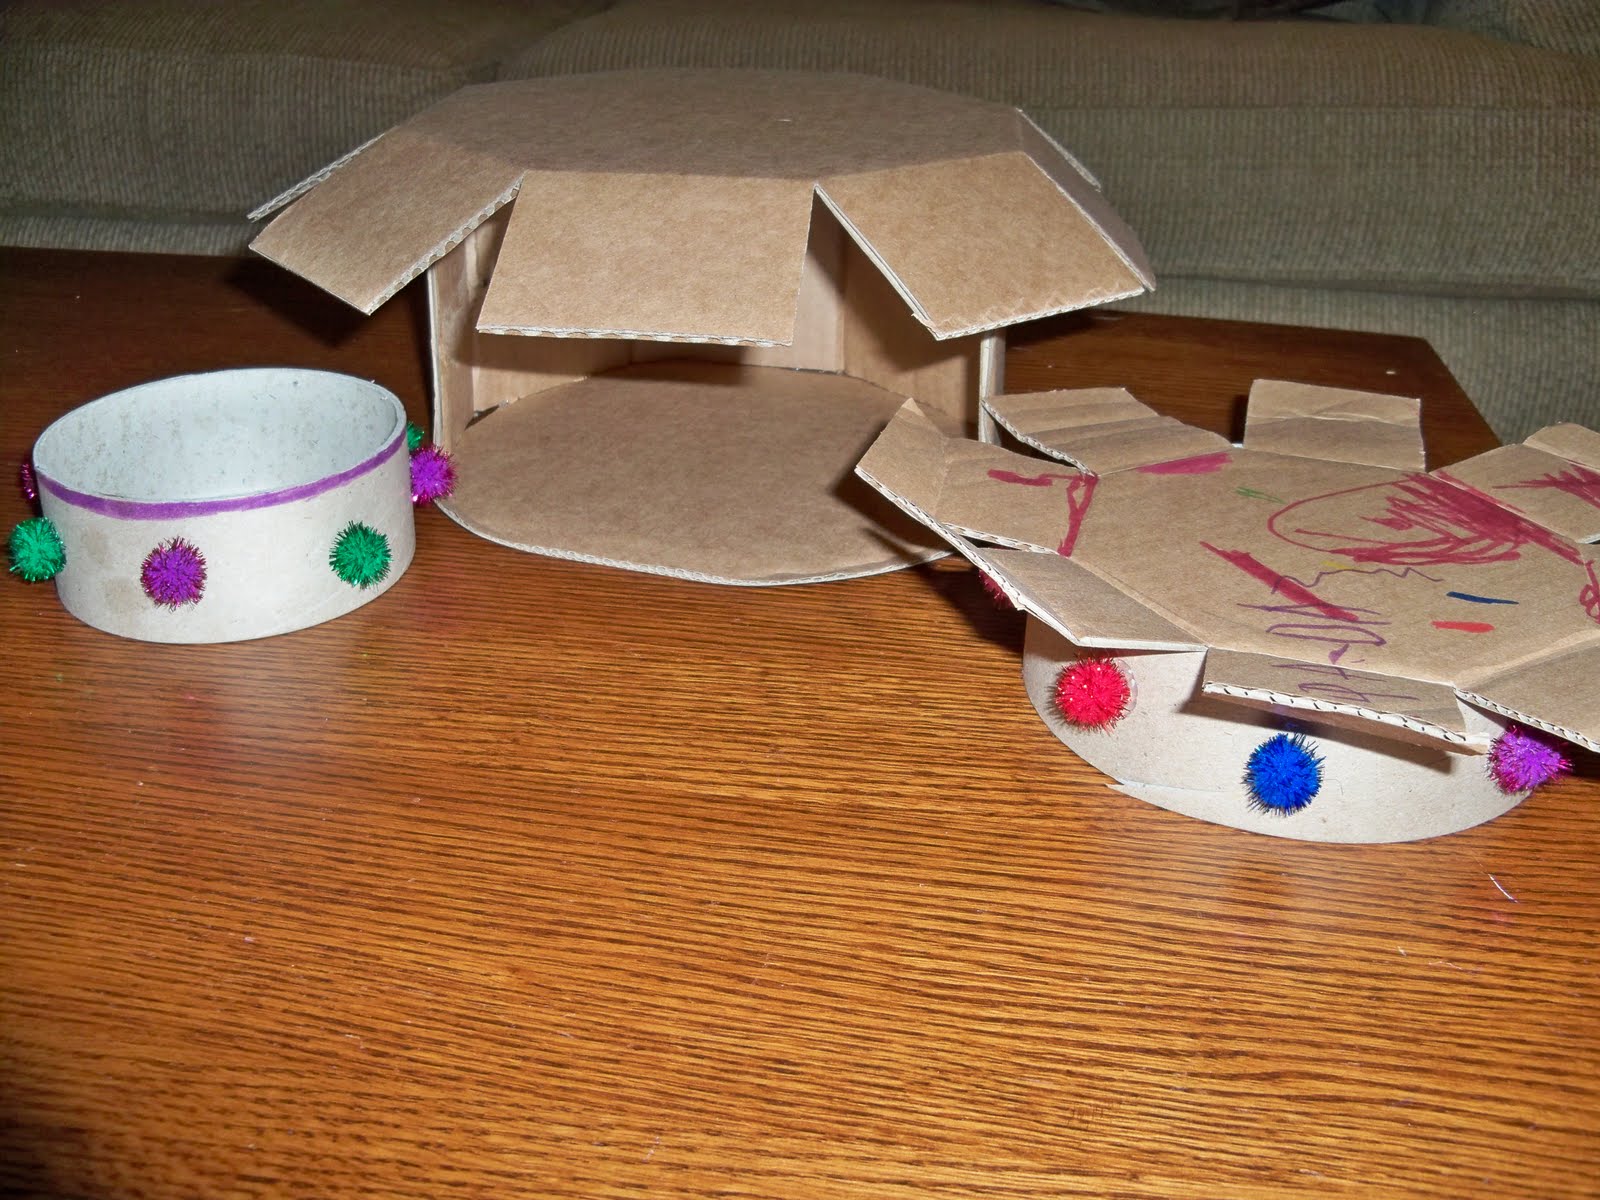 We recently purchased a new set of stainless steal pots and pans to replace our old non-stick set. There are health and environmental reasons behind the switch that I'll delve into deeper at another time. For now, I just wanted to share the fun my children had creating new things out of what would have otherwise ended up in the recycle bin.
What You Need:
Cardboard packaging inserts
Glue
Embellishments
Markers
In the photo above, the children created a bangle bracelet, and home/hut for transformers, and a princess crown. My son refuses to let these go, and we did this project well over a month ago. I was surprised with what they came up with, and everyone had a great time.
Have you re-purposed anything lately? Share with us in the comments box below!
Tuesday, May 18
Homemade Laundry Detergent - Biodegradeable & Chemical Free
I'm used to getting funny looks when I talk about some of the things I make myself, with one exception - laundry detergent. The minute I mention it costs me a little more than $3 to wash 64 loads, everyone asks how I do it. So, I figured it was time to post the recipe online to give my hands a break from writing it out ;)
An added bonus, and the main reason I went searching for this recipe is that it's completely biodegradable, and free from harsh detergents, soaps and dyes. So not only does this wonder soap cost considerably less than store bought jugs, it's safer for my family's skin, safer for our water supply, easier on the machines, and produces less waste for the environment. A win-win in my eyes. It is important to note however that this soap is not like traditional detergents, and it requires a little shake before pouring it into the measuring cup.
What you need:
1C Castile Soap (I use dr. bronner's sal suds - you can buy it here)
2C water
1/3C Salt
1C Baking Soda
Vinegar
1. Warm the salt and baking soda in water until it will no longer dissolve (you will have quite a bit of extra baking soda that does not dissolve and this is why it needs to be slightly shaken prior to measuring out for the laundry).
2. Transfer this to a clean gallon container, add the soap and then fill the rest with water.
3. Use 1/4C per load unless super dirty. For heavily soiled clothing use 1/2C. Add 2 tbsp of vinegar to the rinse cycle. This acts as a fabric softener and disinfectant.
Click here for the original recipe.
If you have any questions or suggestions, please leave a comment.
Happy cleaning!
Sunday, May 16
Pipe Cleaner Flower Pots

This is a great Spring project, and doubles as a gift your children can give to relatives for holidays and birthdays.
What you need:
Pipe cleaners - assorted colors
Pony beads
Dry beans
Dixie cups
Small Styrofoam balls (1 for each "pot")
Paint - we chose green and brown to be realistic, but get creative here!
Craft Glue or Glue gun
1. Paint the Dixie cups and Styrofoam balls and allow to dry.
2. Once dry, fill each Dixie cup with about a half inch of beans - give or take so that your painted ball will still rest nicely inside the Dixie cup.
3. Glue the ball to the Dixie cup by applying glue along the inner edges of the Dixie cup where both objects will touch. This secures the beans.
4. Take one pony bead and one pipe cleaner, loop the pipe cleaner threw the pony bead to create the petals. Expect to ruin at least one pipe cleaner while you get the hang of this - I tried doing this in a bit of a rush, big mistake! :) Allow a bit of pipe cleaner to extend from the loops so that you can attach it to the stem.
5. Create stems by folding a green pip cleaner in half and cutting at that fold (1 pipe cleaner will give you two identical stems).
6. Twist together the flower and stem, and then push the bottom of the flower into the pot.
That's it!
This was a fun project for us, and I think it turned out pretty cute.
Be sure to check back often - I'll be updating the site and adding new posts more frequently.
Did you try this one? Let me know, leave a comment :)
Tuesday, April 27
Dr. Bronner's Castile Soap - Face Wash

For years, as long as I can remember actually, I've had problem skin. When I was younger, we couldn't afford a dermatologist, and now, as an adult, I wanted to avoid one because I knew the "solution" would be in a pill. I prefer to take a more natural approach when it comes to my body. With that being said, I am sooo excited to share this with all of you!
As a last ditch effort I decided to give a pure castile soap a try in hopes it would clear up my sensitive acne prone skin. I had tried every product imaginable from drug stores and department stores, as well as proactive (don't even get me started on that one - ugh!). Nothing worked. I told myself if this last method didn't work, then it was time to make a dermatologist appointment. Oh my gosh am I glad I gave this a try! It's super simple, costs hardly anything and my skin has not been this clear since I was a child.
All I do is mix a small bottle with a 50% castile soap solution and 50% filtered water. I put 2-3 drops in my hand and rub my hands together quickly to form a good lather. I wash my face twice a day this way, and after a month, I am pimple-free. That's it, seriously! Now that my skin is adapting to this method, it has dry days, and I use a handmade face cream (more on that later!).
I use Dr. Bronner's Castile Soap, the mild baby formula. You can buy it online here or go to your local Vitamin Shoppe.
I love that this works because I also use Dr. Bronner's to make my own laundry detergent (for less than $4 for 64 washes), homemade body wash (I actually use the same solution I use for my face, and have since needed far less body lotion), baby wash, dishwasher detergent, and dog shampoo. I'm sure I'll find plenty of other uses for it in the future, and I'll be sure to share.
And, an even better bonus to Dr. Bronner's is that it's completely natural, and biodegradable. I won't harm our water system, or our skin and is produced in a fair way. Because it is free from harsh detergents, it doesn't wreak havoc on my skin (sodium laurel sulfate is a major skin irritant for me).
Let me know if you have questions by leaving a comment below. I'm always happy help!
Monday, April 26
Homemade Buttermilk Ranch Dressing
I brought this dressing to work with me, and everyone raved over it and has been asking for the recipe. This is sooo good, and healthy too!
1 C Cultured Buttermilk
2/3 C Mayo
2/3 C Plain Yogurt
1 tsp Garlic Powder
1 tsp Onion Powder
2 tsp Chopped Chives (or dried)
2 tsp Chopped Dill (or dried)
1 tsp Salt
1/4 tsp Pepper
Combine all of the ingredients in a medium bowl and whisk together quickly until evenly mixed. Refrigerate for 30 minutes prior to serving. This will last as long as the expiration date on your buttermilk.
Enjoy!
Monday, April 5
Grow Your Own Seedlings
 **This a post from my other blog - Clearing Out The Stuff, that I felt could be carried over to this site as well**
This was a huge step for me! If you know me personally, then you probably know just how un-green my thumb really is. I have never been able to keep a plant alive - even the easy ones. This is a difficult area for me, and I know it's silly - so I'm trying super hard :)
As a fun project, my 5 year old son Austin and I decided to try and grow our own seedlings using an inexpensive greenhouse kit (to a more experienced gardener I'm sure this seems wastefull - but I've never done this before, and I wanted my son to see something, lol). This was so easy, we just poured water over the soil packets to make them expand, planted 2-3 seeds in each soil packet, and covered it with the lid - I didn't even have to water it the first week because it stayed so moist.
It's hard to tell from the photo, but everything sprouted, and quickly at that. This photo was taken 1 week after we planted everything. We have six different varieties, and 12 of each, leaving us with 72 plants, and no where to put them, lol. That issue led to me to container gardening and garden beds - but more on those later! We are three weeks out, and so far everything is thriving. It's my hope to have a bunch of fresh veggies this summer for my family. Knowing where my food is coming from, and the soil it's grown in is important to me - not to mention it will save us a lot of money over time if I freeze (or, imagine, learn how to can/preserve!) the food.
Tuesday, March 16
Spring Butterfly
 Welcome Back!
We're counting down the days until Spring arrives - and I know we're not alone! :) We decided to make butterfly's today. This is an easy and fun project for the kids.
What you need:
Pipe cleaners
Scissors
Coffee filters
1) Fold a coffee filter in half and cut out the shape of half of a butterfly wing. Open it up and cut a small hole in the center to slide the pipe cleaner threw.
2) Fold the pipe cleaner in half, and grip the un-joined ends about half an inch down and twist to form antennas
3) Slide the wings onto the body of the butterfly, and there you have it!
Come back soon for more crafty fun!
-Lisa :)
Saturday, March 13
Clothes Pin Alligators
 Welcome Back!
We just got back from a vacation in Florida where we visited a crocodile park. I thought the kids would enjoy this project a lot.
What you need:
Wooden Clothes Pins
Markers or paint
Pipe cleaner
Googly eyes or a black marker
Craft glue
1) Paint or color the clothes pins your desired color (Austin wanted his brown and green). To make the inside of the mouth for the gator, color or paint pink on the inside gripping points (see the photo above)2) Fold the pipe cleaner in half, and then in half again and separate into the "legs", so it will sort of look like an X - glue this inside the gator's mouth and then shape into feet
3) Glue on googly eyes, or color them on with a black marker.
Thanks for Visiting!
I hope you enjoyed this craft. I will be posting another later this week.
-Lisa :)
Sunday, February 28
Easy Wall Art

Welcome Back!
This was a fun project for my son. He's fascinated with reptiles, so we flipped threw some National Geographic magazines (super old ones, lol), and tore out the pictures he liked best.
The frames were in packs of two from the dollar store, and were unfinished.
What you need:
Photos or Magazine pictures cut to the size needed to fit the frame
Lightweight unfinished frames
Acrylic Paint
Paint brushes
1) Paint your frames in the desired color (Austin's room is based around the primary colors, so we plan on hanging these on the blue wall to follow the theme). Gather your photos or cut out the magazine pictures while the frames dry.
2) Insert the photos and you're done!
I hope you enjoyed this one!
Come back soon for more projects for you and your children.
Take care,
Lisa :)
Saturday, February 27
Sensory "Table"
 Welcome Back!
Or maybe I should say "I'm Back!!"
I've been very distracted over the last few weeks, and have jumped into a bunch of projects (I'll post more on that later ;)
So I'd like to jump right back into this one. I will be doing my best to post at least 2-3 new projects each week. I actually started a new blog that focuses on simplifying, gaining health, and living in more sustainable lifestyle. If you'd like to take a peek click here.
Now onto the project....
What you need:
Large plastic storage container w/lid (I used an under the bed version that I already had)
3-4 large bags of uncooked rice (I found these for $1 a piece at the supermarket)
Any extra kitchen "tools" and toys you have - we used measuring cups, Popsicle sticks, funnels, foam pieces and old die-cast trains.
1) Empty all of the bags of uncooked rice into the storage bin and add your "tools" and toys - that's it!
My children will spend a good 30-40 minutes playing in the rice. They pour it from funnels and cups, and make birthday cakes with measuring cups and Popsicle sticks. They like making designs in the rice with their fingers and pushing the die cast cars and trains around in it. I have to stay close by my little one to make sure she doesn't throw the rice all over the place.
Make sure that you close up the rice to avoid small pests.
Thanks for visiting my site and please come back soon! I will be adding a few projects each week.
Take care!
-Lisa :)
Tuesday, February 9
King Cake - Fat Tuesday

We're making a king cake tonight to celebrate fat tuesday. Here's a super simple way to make this complicated cake.
Buy pre-made cinnamon roll dough with frosting. Take out all of the roll segments and shape them into snake like shapes then attach them together to form a circle. Bake according to directions on the package. While that's baking, separate 3 piles of sugar and place in small bowls. Use food coloring to dye the sugar (I used 3 drops per bowl with about 1/4 cup of sugar in each one - traditional colors are purple, green and yellow ( we didn't have yellow, lol). When the cake is done, frost then add the colored sugar in three segments. You can also include a trinket before baking (plastic baby, bean, and so on) - we won't because my children are still too little.
I'll post a pic tonight.
Happy baking!
Lisa
Saturday, February 6
Fuzzy Felt Spider

Welcome Back!
Everyone is finely feeling better in our house, thank goodness! We got back to our crafts this afternoon, but the last few days got me thinking. I'm changing the dynamics of this blog. I still intend to do a craft everyday with my children, but I won't be posting daily - it's just too much right now. I'm limiting my blogging to 2-3 days a week - so you'll still get plenty of crafty ideas :)
My son's 5th birthday is next weekend, and a friend of mine gave him a craft DVD that was completly geared toward his age - I love it! The DVD gives you a few different crafts to complete, and then goes on to tell a story involving the character's your child just created. Thank you Mar! This spider was one of the crafts in the video.
What you need:
2 Sheets of felt in different colors
4 pipe cleaners
Scissors
Fabric Glue
Tape
1) Cut out 1 large circle, 2 smaller ovals for the eyeballs, and 2 tiny circles for the pupils.
2) Glue together the eyeball pieces to create finished eye, and then glue those to the large circle to create your spider base.
3) Hold the 4 pipe cleaners together in your hand so that they are even, and then twist from the ceneter to secure them, you can also take one end and wrap it around the center and then pull it back over to line up the legs. About an inch and a half from each grouped end (4 ends in a group) hold your hand straight, and bend the legs down, then do the same to the tips of that section, but pull them up a bit. Repeat on the other side. Now it should look like cartoon spider legs with feet.
4) Attach the legs to the back of the spider face with tape, and then you're done!
That's it!
My son had a great time making his spider climb the walls of our house this afternoon.
Thanks for visiting, please come back often!
-Lisa
Thursday, February 4
Some Links
Welcome Back!
Everyone in our house is sick now, and none of us really want to do much, lol. If you're looking for some fun craft ideas for you and your children, here's a few links to some sites I enjoy. Hopefully we'll all be up and moving soon, and back on track with our projects.
Nick Jr. Games
Easy Child Crafts
Family Fun
Take care everyone!
-Lisa
Tuesday, February 2
Groundhog Day!
Welcome Back!
Well, both kids are still sick, and Austin had no desire to do much of anything today, so I went online to look for a cartoon groundhog for Hannah to scribble on. I found this, and it looks a lot like the one I did when I was little for the movie Groundhog's Day staring Bill Murray. It was filmed in the town we live in, and it's a huge deal over here, lol. Our little theater plays the movie for free the entire week, and people can take tours of the town's square where it was filmed and see the spot where Bill Murray tripped and fell into the street - seriously. So, that being said, I just couldn't let the day go by with out doing something festive :)
Please be sure to check back tomorrow - hopefully my little artist will be feeling better.
-Lisa
Monday, February 1
Make A Face

Welcome Back!
Austin is still a little under the weather, but he said he wanted to do a project, so we did this, and he had a great time. He thought making his own people, or aliens as he put it, was hilarious.
What you need:
Construstion paper for the base
Magazines
Scissors
Glue stick
1) Depending on your child's age, either cut out a bunch of body parts from the magazine, or have them do it.
2) Let your child glue the parts together however they want.
3) Talk about what you see in the finished image and what the new characters are doing.
That's it! This is so simple and inexpensive, and so far I'd have to say this was one of Austin's favorites.
Be sure to sign up for the daily emails so you don't miss a project.
Come back again soon!
-Lisa
Sunday, January 31
DIY Memory Board

Welcome Back!
It's a Momma Craft day!
I'm always looking for ways to use the odds and ends around my house, so I'm delighted that this turned out as well as it did. I didn't have to purchase a single thing to make this, and it's going to look great in Hannah's room! This picture really does not do it justice.
What you need:
Cardboard (or any sturdy solid lightweight piece - I used foam core, I've also heard of people using styrofoam)
Fabric large enough to cover the entire surface of the board and wrap to the back (I used one of Hannah's old baby blankets)
Various ribbons
Scissors
Glue Gun
1) Cut your board down to desired size (you can make these small for inside of lockers and attach magnetic tape to the back)
2) Using the hot glue gun, glue one entire side and let set. Pull the fabric taught, and glue the opposite end, repeat with the other sides so that the fabric is pulled and there are no wrinkles or bumps.
3) Glue on the ribbon strips in whatever fashion you'd like. I did one entire angled row, and then did the opposite angles so I could see where everything was going to intersect.
4) Find a few intersecting points, and glue them down, but don't do all of them, that way you can slip in different sized photos and momentos. I glued on iron on appliques to these spots to cover the glue and give it more personality.
That's it! If you used styrofoam, you can put nails in the wall, and then push the board into it. If it's a small locker board, attach some magnetic tape to the back. I don't plan on mounting mine to the wall, but instead resting it against the wall on top of her short but long dresser.
If you have any questions on this project or any others, just let me know by using the comment boxes.
Thanks for stopping by and be sure to visit often!
-Lisa
Subscribe to:
Posts (Atom)