Showing posts with label Tutorial. Show all posts

Wednesday, February 10

Easy Way To Start Seeds Indoors

 
Last summer a close friend of mine saved a TON of eggshells to start her seedlings in. She had a pretty cool setup going on and her seedlings thrived. She ended up with more tomato plants than she knew what to do with and passed some along to me. We were still in a townhouse at that time, so I could only take a few and placed them in pots. Wow, did those grow an amazing amount of tomatoes! Seriously - I vowed once I had a yard, I would do the same. 
 
So here we are...
 
 
First, I think it's important that I state right now - I have never grown a full sized garden on my own. Nope, never.
 
This year will be my first. When we were in the townhouse, Chris built a raised bed that was 1' x 10' behind the retaining wall near the back of our "yard" that I used to grow herbs, lettuce and radishes in. This worked a little bit, but it was kind of ridiculous. I had to climb up a small ladder to reach even the dirt (I might have fallen off said ladder a time or two...don't worry, it was a short one) so weeding was a major pain and the wooded lot behind us would get so overgrown, that unless we went back there with a chainsaw (remember - this wasn't technically ours - but we did do this once - shhhh!) the plants would not get enough sunlight. I still tried though - when there's a will, there's a way, right??
 
I'm always up for trying. I figure I don't have much to lose. We want to grow a massive amount of fruits and vegetables, enough so we can pass along or donate what our family doesn't need. I also want to do that as inexpensively as possible. This pretty much requires I start everything from seeds.
 
After researching this method, I've decided it's most definitely worth a try.
Even better - you can plant the whole thing - eggshell and all, right into the ground! 
 

The first thing we did was save every eggshell we could, rinsed them out and left them to dry on the counter.


I poked drainage holes in the bottom of each eggshell to prevent over watering. Looking back, it might have been better to use a darning needle, or at least something thinner than my digital thermometer. I broke a couple doing this.


Using organic seed starter soil, I filled each egg with a large spoon.


Different seeds need to be planted at varying depths, so for the more shallow seeds (usually the small seeds), I used my smaller shells and for the deeper ones, the larger shells. I also made sure to label and date each section. Plus I can really only focus on cold weather crops at this point. I plan on doing succession planting, so I need to know the dates.. That's not something my brain can handle on it's own. I can hardly remember what I did an hour ago.


Based off of the planting depth, I used an unsharpened pencil to make mini holes to place the seeds.


We set up an extra pantry rack we had in the garage next to our kitchen window. This way they will get plenty of sunlight. It also keeps them off of the kitchen table. I haven't even hit the tip of the iceberg yet as far as planting is concerned. We need to eat more eggs and get more shells going. I also picked up this cool little gadget that will make square blocks to start seeds in without needing a pot of any kind. I want to use that for the larger plants, but those won't go in until next month.
 
I'm not sure which container will work better - the plastic because the soil can later absorb excess water from the bottom, or the cardboard because it will absorb the excess water. I have been misting them with a spray bottle, so they are not getting saturated. I'll have to post an update once things start growing.
 
 So far it seems to be working. I did come home to an egg casualty tonight and a pile of dirt on my kitchen floor. Courtesy of Jackson the cat. Darn cat.

Monday, February 4

DIY Sewing Cards for Kids

 
My little girl has taken an interest in sewing lately.
 
She's come up with all sorts of fun projects she wants to complete - sewn crowns, doll clothing, princess dresses and matching pajamas for her and her sister - just to name a few.
 
I want to encourage her to pursue this, but something about a four year old and needles just doesn't sit well with me. Part of the problem is that she wants to do most of it herself - which is great and nerve wrecking at the same time.
 
 It took a while, but I was able to convince her that if she practiced enough on her new sewing cards, I would let her start using the real thing. I haven't decided just how much "practice" she will need, maybe a year or two?
 
We made our own sewing cards, and it was really easy to do.
 
 
What you need:
 
Scrap book paper (optional - you could also use computer paper and decorate it or leave it plain)
Laminator
3 or 5 mil laminating sheets (I use 5 mil)
Hole puncher
Yarn
Tape


1). Using your paper, cut out desired shapes.


2). Place shapes in laminator sheets and then laminate them.


3). Trim around each shape, making sure that all the edges are smooth and rounded well. Take your hole puncher and punch holes along the edge.


4). Cut a long piece of yarn and then wrap tape around each end to stop frays and allow for easy threading.


That's it! Super easy, and for us it was free because we had all of the supplies already.
 
 
Happy Monday Everyone!
- Lisa :)


** featured on**
 

Thursday, January 24

DIY Lotion Disc's - The Best Dry Skin Solution

 
It seems like every year, my skin gets angrier and angrier during the dry winter months. This year is no exception. I do however, have a solution this time around.
 
Lotion Disc's!
 
My goodness, where do I even begin! They are really THAT great.
 
I have tried just about everything to keep my skin moisturized during the winter, and nothing ever works very well. As I get older, and I'm not that old - really, it's getting worse. Not to mention I've been running regularly for over 10 years now and that seems to compound the dryness on my feet. I've gone as far as slathering thick expensive face cream on my feet at night, and covering them with socks so I don't ruin the sheets. That works for about half a day.
 
These little disc's however, took care of all my dry skin issues in less than a few days!
 
I came across this solution to dry skin completely on accident. As a lot of you know, I'm on a Spending Fast for the entire year. Of course when I went on my little frantic spending spree to pick up "important" stuff, I didn't grab lotion. I just assumed I would make my own since I had everything I needed to make it already in my cabinets.
 
I did make my own lotion, but I'm just not thrilled with it. It hardens up and is kind of messy.
 
The lotion disc's are the perfect answer to that problem too. They don't make a mess, they are a lot easier to make than actual lotion, and they keep my skin softer than any water based lotion ever has.
 
There are a ton of recipes for these online, but I'm really happy with mine so I want to share. So far I have made two different kinds - one for me and one for little Stella's eczema.
 
***
 
The directions below will make one of Stella's lotion disc's. The recipe for the one I use will be at the bottom of this post.
 
 
What you need:
 
Stella's Lotion Disc - yields 1 disc
 
1 Tbsp Organic Beeswax
1 Tbsp Organic Shea Butter
1 Tbsp Organic Olive Oil
3 Vitamin E soft gels
Toothpick
Muffin Tin
Cupcake liner


1). Put all of the ingredients except the vitamin e into a double boiler or a glass Pyrex measuring cup. I don't own a double boiler, so I melt mine in a glass cup in the microwave. Yes, I know, microwaves are baaaaad - I think we will be ok ;)


2) Melt the beeswax, shea butter and olive oil in your double boiler. If you plan on using your microwave, heat it slowly. The idea is to warm it up just enough to melt, you don't want it getting too hot. I warm mine in 35 second increments 3 times and in between each increment, I give it a quick stir with a toothpick. Your times may be a little different though, so play with it if you have to.


3) Once everything is melted, take a toothpick and puncture each soft gel and squeeze the vitamin e oil into your melted oils. Give it a few good stirs with a toothpick again.


4). Place your cupcake liner in the muffin tin and then pour your melted oil mixture into the liner. Allow it to cool until it's solid. Reomve the wrapper and it's ready to use.


Lisa's Lotion Disc - yields 1 disc

1 Tbsp Organic Beeswax
1 Tbsp Organic Coconut Oil
1 Tbsp Organic Sweet Almond Oil
3 Vitamin E soft gels
Toothpick
Muffin Tin
Cupcake liner
 
Follow the directions for Stella's lotion disc.


That's it! So easy and so effective. I absolutely love these! Try them and let me know what you think. The disc in the picture above has lasted about three weeks so far. Overall, I think this is not only more effective than water based lotion, but also a lot cheaper. To use them, just simply rub the bar along your skin, focusing on the dryer areas. The shea butter bar takes a few more minutes to absorb into your skin than the coconut oil bar does, but both work really well.
 

Monday, January 21

DIY Classroom Valentine's


I try to take care of classroom Valentine's before February even rolls around. It just makes my life easier. My oldest child's birthday happens to be the day before, and things can get really hectic, really fast. I seem to have a habit of forgetting some of the day to day stuff when we get to that week too. So, for everyone's sanity, we plan ahead.
 
Right now, my son's current obsession favorite toy are these tiny little guys called Crazy Cubes. Naturally, when I asked him what type of Valentine he would like to hand out this year, he told me "A Crazy Cube one! That would be so awesome!"
 
Of course it would, except they don't make them.
 
When I told him that, he looked at me and said "well, couldn't we just make them ourselves?"
 
Of course we can!
 
The Valentine's were actually really easy to do, and you don't need special software to do it. I just scanned a drawing on to my computer and did the rest of the editing and type layout in Picasa and then placed them in Word to fit 6 to an 8.5 x 11 sheet of paper.
 
Yes, fellow designers and image folks, I know that's not the best way to do it - but this way works just fine and anyone can do it.


First things first, you will want to decide on your theme. My Valentine included hand drawings, but if that's not an option for you, no worries, use a photo of your child (check out Pinterest for some really great creative ideas). If you are drawing, scan your finished image on to your computer. I re-sized my scanned image to 5x7.
 
Bring your image into Picasa and start editing. I like to edit in their Creative Kit option, if gives you more freedom. That's where I found the hand drawn hearts, and placed the cool font. This is also where I touched up any stray pencil marks.
 
Once you have your image finished, save it. Open word, change the page layout to landscape and insert your finished image. Adjust the size to your liking, copy and then paste as many as you can fit on a page.


Print them out, cut them up and you're done!
 
Happy Monday!
-Lisa :)
 
 
** This post is linked to Homemade Monday's link party, hosted by "Frugal by Choice, Cheap by Necessity AND New Nostalgia Anti-Procrastination Tuesday**

Thursday, November 15

The LP Infinity Scarf - Free Knitting Pattern


I am sooo excited to share this with all of you today! I have been playing around with creating knitting patterns for a few years now and I have finally found the courage to share one. I know that sounds silly, but I always second guess myself, and though this is a very easy pattern, I think it turned out cute and I felt compelled to share. So please excuse any beginner pattern making mistakes. Thanks in advance!
 
It's also very rare that you will find me in front of the camera, I prefer the behind the scenes role quite honestly. Chris was jumping around trying to act like we were having some major photo shoot and it was a little hard to keep a straight face.
 
This is easy enough for a beginner, but still a satisfyingly quick knit for the more advanced.


The finished scarf is long enough to wrap around twice, which will keep you nice and warm.


I used Quince&co's puffin in Honey 123. I love it for both the texture and color. You can use any bulky weight yarn for this pattern, though different brands will yield slightly different results.
 
 
What you need:
 
Size 15 (10mm) 24" circular needles
1 Skein of bulky weight yarn (I used about 110 yards)
gauge: 4" = 7 stitches
 
CO 81 stitches
 
before joining in the round, twist the loop on the left needle so that the bottom of your scarf is at the top of your needle. This is what will create the twist in your scarf.
 
1)K1P1 for one round
2)P1 K1 for one round - this will create the "seed stitch"
3) repeat 1&2 until the scarf measures 5" in thickness
4) Bind off using K & P
 
**Should you end up with two knit stitches or purl stitches in a row where you joined your piece, simply k2tg and that will even it out**


Monday, October 22

DIY Reupholstered Bench Project

 
I am so excited to share this with all of you today! A while back my friend Kristy found this cute little bench on Craig's list for my girls room (thanks again Kristy! We all love it!). It was super cute, but the bench top wasn't exactly cushy, and the fabric had some yuck-o stains.


Here is the before shot.
 
I knew from the get-go that I wanted to reupholster it.
Since I had never done anything like that before, it seemed like the perfect first project.
 
It really was too, this is so easy to do.
 
What you need:
Cut of home accent fabric large enough to wrap around the surfaced to be covered, plus and extra inch for stapling.
Same size cut of batting
Staple Gun and staples
Foam (I used a mattress topper cut to size and doubled up so that both outer sides were smooth)
Spray adhesive
Screwdriver (only if you need to remove previous staples)
Pen


I started this project by removing all of the previous staples using a flat screwdriver. Once that was finished I placed the piece of MDF that was already part of the bench on top of my mattress topper. I drew a line in pen about a half inch away from the edges, around the entire parameter of the board. It's good to have the foam a little larger. This prevents sharp edges and corners after it's stapled down. I did this twice so I had two pieces of foam.


 Once that was finished, I sandwiched the two pieces of foam together so the bumpy ends were facing each other (see above). After I found a good placement, I lifted up one side and applied some spray adhesive, and then again did the same on the other side.
 
 
 Look at that old icky foam - so glad I decided to take it apart!
 
 
Nest, with the batting on the ground, I placed the foam sandwich on top, making sure there was plenty of batting to pull up and staple around the entire bench. I sprayed the foam with adhesive and placed the MDF on top. After letting that dry for a few minutes, I folded up the edges of the batting about a half inch and stapled all of it to the MDF. I wish I would have taken pictures of this part! To be honest, it was the first time I had ever used a staple gun, and I had so much fun, that I completely forgot the photos. Seriously.
 
When you do this, make sure to pull tight so that everthing is smooth and taught. I found the best results by starting on a long edge in the middle, followed by the opposite edge, then the center of the short edge, followed by the opposite edge and then stapling around in that fashion until all the edges were finished and taught. Don't be alarmed by the amount of staples, the more the better.
 
Once you have the batting in place, lay out your fabric in the exact same way, and staple that on in the same maner.
 
I absolutely love how it turned out! My girls love it too! I had some leftover fabric so I made a little decorative pillow. It doesn't normally sit on the bench, but on a white rocking chair on the other side of the girls room. 


 Thank you stopping by and letting me share this with you!
 
 
Wishing you a wonderful start to a beautiful week!
- Lisa

Friday, October 19

DIY Halloween Wall Art

 
I have a fascination with all of the "keep calm and ...." signs. They are everywhere, I know. Why I never purchased one, I'm not quite sure.  They look adorable, and a bunch of different Halloween versions have been popping up on pintrest lately. My original plan was to re-create a sign,  print it out on cardstock and then frame it.
 
I did do that, well, not the framing part though. Something is wrong with my printer, so the solid background just wasn't going to happen for me. I kept getting color fades and lines and it just didn't look all that great. My perfectionism was not about to let me settle, so a little brain storming was in order.
 
 I came up with a re-purposing project!
 
And I had to figure out how to paint particle board...
 
 A while back we had to replace our 8 slot storage cube shelf. At some point it had suffered some water damage to the top (I've given up trying to figure out how or why - I just know it involved my little people). Chris broke all of the pieces down so it would be easy to dispose of. While he was doing that, I noticed most of the undamaged parts were the same size and shape as the mock canvas art you can buy. So, we set aside the clean parts for future projects. I have to give my husband credit here, he doesn't even think twice anymore when I suggest things like this. Love him for that!
 
Can you tell where I'm going with this??
 
Chris cut down one of the longer sections for me, and I filled the holes with my hot glue gun. In the future I will use wood putty or something similar, the glue left divots. When I get excited about something I have a tendency to keep pushing forward even if I know there is a better way - oops!
 
After the glue dried, I lightly sanded the surfaces that I planned on covering with paint. I followed some directions I found on pintrest for painting the particle board.
 
 
Then I primed the board twice, lightly sanding it down in-between coats to even out brush strokes.
 
 
Once everything was dry, I applied three, yes three, coats of craft paint. I had to let the paint dry for over an hour in-between coats. The directions called for 21 days for the paint to cure, but I couldn't wait that long. I have just been very careful not to rub it up against anything. So far so good.
 
I whipped up a quick "Keep Calm" design in Silhouette Studio. The skull was a pre-made graphic from their shop, and the text was done by me using the font Impact.
 
I used vinyl here, but you could get similar results printing out a stencil and using an exacto knife to cut out the images, it would just take a little longer and more painting would be needed.
 
 
Using contact paper to keep the placement right, I attached the vinyl and there it is!
 
I looove this so much!
 
 
Have a great weekend everyone!
-Lisa

Thursday, October 4

DIY Butterfly Wall Art


Christmas came early for me this year my friends! A few days ago, my very own Silhouette Cameo showed up on my doorstep. Yay! For months and months I've been planning, plotting and pinning all the different projects that would be made possible with this awesome machine. I waited forever before finally buckling under the crafting pressure to actually buy it. But now that I have it, I'm thrilled!
 
There was a bit of a learning curve to get it up and running smoothly - and I think I have most of the kinks ironed out. Or at least I hope.
 
This was my first real project using the machine. You could easily replicate this by using butterfly hand punches. I think I have seen them at crafting stores. If you have a Silhouette, all you have to do is place nine regular sized butterflies on an 8.5 x 11 board, and six 3" butterflies on a board.


I used 65# white cardstock for this project. I absolutely love how white pops on pastels. Once you have your butterflies cut out, all you have to do is slightly bend each wing up. I used double sided tape to attach them to the wall. So far they are holding up well.
 
My girls were thrilled to see the butterflies - and I think that's what made the project a success for me.
 
Another awesome part? It only took about 15 minutes to do!
 
 
Have a great day!
-Lisa

Wednesday, August 8

Organization On a Budget - DIY Daily System

source

For about the last year or so, I have had my eye on Pottery Barn's Daily System (shown above). Unfortunately for me, I can't quite bring myself to cough up the money for this amazing system. For all the parts - yes, it is purchased in parts - that I want, would have me spending upwards of $200. I'm all for organization that is both attractive and functional - but I'm not down with dropping all my cash for that perk.

Which brings me to my first project to share!

It's not perfect or completely finished - but I couldn't hold back my excitement about my project any longer. I just had to share. So far I have invested a total $23 into my system and I'm pretty excited about that. In all fairness, I did have the giant sized cork board going unused in my basement already - as well as the paint - so I'm not including those in my total spent. You can find a cork board this size at discount stores for around $5-10 - still not a bad deal.
Here is what I did...
I have been wanting to do something with is awkward wall of mine since moving in 8 years ago (true story! Eight years and no ideas on my end). You can't see in the pictures, but there is only about 3 feet of walking space between that wall and another wall as well as the door to our basement. Nothing ever seemed to work. When I fell in love with the Daily System from Pottery Barn, Chris and I agreed that it would be a perfect fit for that wall. But neither one of us had any intention of actually buying the system - again - budget issues. So the wall remained empty and my fridge remained covered in papers.
Until.... A light bulb went off in my head and a realized I could use that old cork board and paint it the color of my walls with our tub of touch up paint! I ran right out into the garage and started painting. I decided to tape off the cork and paint the trim of the board white to add some contrast. Easy peasy. The whole painting part was finished in 30 minutes, start to finish.
Then I went on a search for hanging pocket folders that would mimic the style of the Daily Systems folders. It took a while but I finally found these!


source

They were perfect! And at $9 a piece, worth it in my mind. They are heavy duty, match beautifully and work like a charm. I did have to attach them to the cork board with my glue gun because the adhesive backing was not sticky at all. You can also just use the giant push pins that come with it, but they are huge and sharp and I really don't want one of my children to accidentally come in contact with one of those ginormous sharp pins.


I found simple and easy to attach tiny command hooks for a key holder. This came about right when we "lost" our second set of keys. I think that helped drive home the importance of having a place for said keys so that didn't happen again in the future. Thankfully two weeks later the lost set magically appeared inside the pocket of a pink stroller. Hmmmnnn... Did I mention this is out of reach for the smaller people in our house?

This is in a high traffic area of our house, so we decided to drill it to the wall. I just painted over the screws.


When I finally get around to buying more ink for my printer, I will type out the labels to give this a nicer appearance. I'm also on the search for a pretty calendar and a way to hold pens to the board so I don't have to keep walking to the other side of the wall for them.

 All in all, I'm thrilled with this simple little system. My refrigerator is cleared off and looks awesome blank - my mom actually thought we bought a new one! It's amazing what a clear fridge does for the appearance of a kitchen. I also love that now all the paper work I need for each child is easy to find at a moments notice. When Stella starts school, I will just simply attach one more folder to the board.

Have a great day!
-Lisa


Wednesday, October 19

Chalkboard labels - tutorial

I have a wonderful way of forgetting what things are, once they come out of the bags I purchased them in. Especially when said "things" are dried grains. I can't be the only one, can I?
My solution?

Labels! But not just any old label. A chalkboard label so I can change the contents without having to change the container.


Want to make your own?


Here's what I did...


What you need:
Large mason jars - as many as you want
Chalkboard spray paint
Painters tape

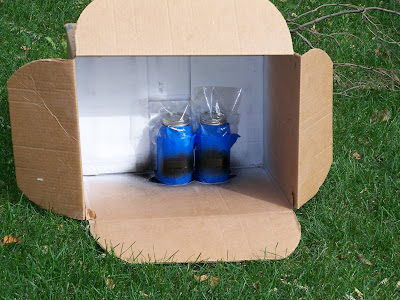
1) Cover your jar with painters tape everywhere except where you want the chalkboard surface to be. I also attached a plastic baggy on top just to be sure I didn't get random splatters.


2) Paint the jars according to the directions on your can of paint.


3) Allow to dry and remove the tape.


That's it! I love these! Definetly a quick and easy project that I'm sure you didn't actually need a tutorial for, but it's always nice to see how someone does it. Now to think of other uses for my still almost full can of chalkboard spray paint...