Pages

Tuesday, October 30

Playroom Update

 
Our playroom (a.k.a. loft) gets a lot of my attention. My girls are in this area for a good portion of almost every day. My oldest likes to keep all of his things in his room, but he does end up here from time to time. Usually for the computer or a place to read. I am in here daily with the girls and to use the computer. 
 
This room has a lot of activity, which makes it important to keep organized and functional. Because in the blink of an eye, the room can go from looking kind of cute, to a crazy pile of puzzle pieces, play kitchen toys and books.


I have made a bunch of updates lately, and I wanted to share some of the little projects and organized spots with all of you.


First, our new computer chair/rocker. I have been eyeing these cradle rocking chairs for almost a year now and wanted one badly. I sold a bunch of old clothes and things we don't need on facebook, so with that money I was able to buy this chair. Yay!


Quite a few months ago, I happened across these ottomans and after finding out they were only $16, I scooped both of them up. They are perfect for grabbing a quick book and really, you can never go wrong with extra seating.


For years we have used storage cubbies to help organize and corral our things. Would you believe we had never once purchased one of the little fold out drawers that can go with them? Seriously. I finally went ahead and picked up four of them when they went on sale and oh my gosh! I have been missing out! Case in point. The photo below. I could never store these without the help of the drawer.


The drawers also help give the cubbie a cleaner look, which makes me happy.


I have a handful of books I like to keep by the computer for quick referencing. It's nice to have them right on hand, but with our goofy corner desk that we're using right now, they don't always look so great. It took me a while to find a solution, but then one day it dawned on me that I could store the books inside magazine files. I found these for a dollar each and it has been working perfectly for over a year now.


We have a half wall in this room that we have always kept picture frames on. As much as I loved the photos they displayed, I hated the mismatched look of them along the wall. To unify everything, I spray painted all of the frames white. I absolutely love them now! They are all different shapes and styles, but the white pulls everything together. I added a few accent pieces to break up the frames as well.


One of the frames I had was really small, 3x5 I think, and I couldn't find any pictures that worked with that size. I decided to create my own little framed art. I used my silhouette cameo to make the cut outs and the images I designed on the computer. I need to re-do the Emily Dickinson quote so that you can easily read it, but other than that I am really happy with how it turned out. It's simple, but it adds a much needed pop of color.
 
I hope everyone has a fun and safe Halloween tomorrow! I'll be back on Thursday.
 
For everyone on the East Coast, please stay safe - we're sending our thoughts and prayers your way.

Monday, October 29

Halloween Oreo Cupcakes


Can you believe Halloween will be here in two days!?
 
Thankfully, this year we starting planning early and because of that, I was able to get a lot of the things I wanted to accomplish done. The front door got a simple, but effective spooky spruce up, I was able to finish a DIY Halloween wall art piece that I had been dreaming up for a few weeks, I managed to cut out and laminate holiday bookmarks annnnnd, I had time to whip up a whole lotta cupcakes. Like, A LOT, of cupcakes - maybe about six dozen or so.
 
My son's school had a Fall Festival the other night. Earlier in the week, they sent home a flier requesting baked goods for a cake walk. I got excited at the idea of being able to make more fun and crafty cupcakes - is that strange??? I had so much fun baking and experimenting with different frostings and cakes for Stella's party, and I was itching for an excuse to do it again.
 
Chris and I brainstormed for a little bit, and then finally decided on a chocolate cake recipe and a cookies and cream frosting - which, after trying, we fell in love with - it's soooo good!


I love trying to make simple things look pretty, and, well, look not so simple. So we went on a decoration hunt. We found cute spider wrappers and rings. My husband suggested the fang idea, which I shot down at first, but I'm so glad he talked me into it! I think it looks awesome! And the kiddo's get to have a cool souvenir when they're done.


I used Halloween oreos for the frosting and for the decorative tops. I also used plain unbleached paper liners to bake the cupcakes in, and then double lined them with the decorative wrappers. This keeps the pretty wrappers looking good and evenly colored.


Here are my oldest two, all dressed up, walking to the festival. I love them so!
 
Wishing you a wonderful start to your week!
-Lisa

Tuesday, October 23

Quick Vinyl Dollar Store Project

 
Hi everyone! It's a busy week over here, so my posts will be on the shorter side.
 
I just wanted to pop in today to share a quick little dollar store project. I found these pink baskets a long time ago, and had planned on using them to hold the girl's "hair pretties" as we call them in our house.
 
Which was great at first, but then my four year old kept digging into my one year old's stash and clipping it bitty bows all over her head and her dolls and ponies and, well, you get the idea.
 
 
So, up they went on top of their dresser. The only problem? I couldn't see inside of them, I'm a little short. It may not seem like a big deal, but when we're doing the mad dash to get out of the house on time, I would prefer to always grab the right bucket for whoever needs a clip, and not have to think about it.
 
My solution? Vinyl of course!
 
 
I whipped up these little labels in about 5 five minutes, and 5 minutes later had them cut out and ready to go.
 
 
I liked the reverse image so much, and thought it would be wasteful to toss it. So The reverse image is one side...


And the actual design is on the other. And now, you can all see that my mirrors need to be cleaned. Maybe I should have been doing that instead of labeling "hair pretty" buckets ;)
 
I hope you are having a wonderful day!
-Lisa

Monday, October 22

DIY Reupholstered Bench Project

 
I am so excited to share this with all of you today! A while back my friend Kristy found this cute little bench on Craig's list for my girls room (thanks again Kristy! We all love it!). It was super cute, but the bench top wasn't exactly cushy, and the fabric had some yuck-o stains.


Here is the before shot.
 
I knew from the get-go that I wanted to reupholster it.
Since I had never done anything like that before, it seemed like the perfect first project.
 
It really was too, this is so easy to do.
 
What you need:
Cut of home accent fabric large enough to wrap around the surfaced to be covered, plus and extra inch for stapling.
Same size cut of batting
Staple Gun and staples
Foam (I used a mattress topper cut to size and doubled up so that both outer sides were smooth)
Spray adhesive
Screwdriver (only if you need to remove previous staples)
Pen


I started this project by removing all of the previous staples using a flat screwdriver. Once that was finished I placed the piece of MDF that was already part of the bench on top of my mattress topper. I drew a line in pen about a half inch away from the edges, around the entire parameter of the board. It's good to have the foam a little larger. This prevents sharp edges and corners after it's stapled down. I did this twice so I had two pieces of foam.


 Once that was finished, I sandwiched the two pieces of foam together so the bumpy ends were facing each other (see above). After I found a good placement, I lifted up one side and applied some spray adhesive, and then again did the same on the other side.
 
 
 Look at that old icky foam - so glad I decided to take it apart!
 
 
Nest, with the batting on the ground, I placed the foam sandwich on top, making sure there was plenty of batting to pull up and staple around the entire bench. I sprayed the foam with adhesive and placed the MDF on top. After letting that dry for a few minutes, I folded up the edges of the batting about a half inch and stapled all of it to the MDF. I wish I would have taken pictures of this part! To be honest, it was the first time I had ever used a staple gun, and I had so much fun, that I completely forgot the photos. Seriously.
 
When you do this, make sure to pull tight so that everthing is smooth and taught. I found the best results by starting on a long edge in the middle, followed by the opposite edge, then the center of the short edge, followed by the opposite edge and then stapling around in that fashion until all the edges were finished and taught. Don't be alarmed by the amount of staples, the more the better.
 
Once you have the batting in place, lay out your fabric in the exact same way, and staple that on in the same maner.
 
I absolutely love how it turned out! My girls love it too! I had some leftover fabric so I made a little decorative pillow. It doesn't normally sit on the bench, but on a white rocking chair on the other side of the girls room. 


 Thank you stopping by and letting me share this with you!
 
 
Wishing you a wonderful start to a beautiful week!
- Lisa

Friday, October 19

DIY Halloween Wall Art

 
I have a fascination with all of the "keep calm and ...." signs. They are everywhere, I know. Why I never purchased one, I'm not quite sure.  They look adorable, and a bunch of different Halloween versions have been popping up on pintrest lately. My original plan was to re-create a sign,  print it out on cardstock and then frame it.
 
I did do that, well, not the framing part though. Something is wrong with my printer, so the solid background just wasn't going to happen for me. I kept getting color fades and lines and it just didn't look all that great. My perfectionism was not about to let me settle, so a little brain storming was in order.
 
 I came up with a re-purposing project!
 
And I had to figure out how to paint particle board...
 
 A while back we had to replace our 8 slot storage cube shelf. At some point it had suffered some water damage to the top (I've given up trying to figure out how or why - I just know it involved my little people). Chris broke all of the pieces down so it would be easy to dispose of. While he was doing that, I noticed most of the undamaged parts were the same size and shape as the mock canvas art you can buy. So, we set aside the clean parts for future projects. I have to give my husband credit here, he doesn't even think twice anymore when I suggest things like this. Love him for that!
 
Can you tell where I'm going with this??
 
Chris cut down one of the longer sections for me, and I filled the holes with my hot glue gun. In the future I will use wood putty or something similar, the glue left divots. When I get excited about something I have a tendency to keep pushing forward even if I know there is a better way - oops!
 
After the glue dried, I lightly sanded the surfaces that I planned on covering with paint. I followed some directions I found on pintrest for painting the particle board.
 
 
Then I primed the board twice, lightly sanding it down in-between coats to even out brush strokes.
 
 
Once everything was dry, I applied three, yes three, coats of craft paint. I had to let the paint dry for over an hour in-between coats. The directions called for 21 days for the paint to cure, but I couldn't wait that long. I have just been very careful not to rub it up against anything. So far so good.
 
I whipped up a quick "Keep Calm" design in Silhouette Studio. The skull was a pre-made graphic from their shop, and the text was done by me using the font Impact.
 
I used vinyl here, but you could get similar results printing out a stencil and using an exacto knife to cut out the images, it would just take a little longer and more painting would be needed.
 
 
Using contact paper to keep the placement right, I attached the vinyl and there it is!
 
I looove this so much!
 
 
Have a great weekend everyone!
-Lisa

Thursday, October 18

Candy Free Halloween Party Favors

 
I remember being shocked by the amount of candy handed out at the very first Halloween party or "Fall" Party that my oldest went to at school. He was 4 and came home with a pile of tiny bags filled with treats. Don't get me wrong, I know how much fun it is to put together little things for the kids and I love seeing their eyes light up in excitement just as much as the next parent. I just wish there was a little less junk food.
 
I was bound and determined this year to find something for my kids to hand out that didn't involve sugar, and wasn't "totally lame". That's no easy feat, let me tell you. So I was thrilled when I came across these free printable bookmarks (click on the link to get your own!).

Look at how cute they are! But not only that, they meet my son's "cool" standard (he's in second grade - I know the bar will keep getting higher).
 
I printed out enough for 32 bookmarks on white 65# cardstock. After cutting them all out, I decided to laminate them for extra durability.
 
A word of advice - don't do like me and put your laminator on top of the stove. As I was snapping this pic, I failed to notice the corner getting stuck in the stove burners. Yup, I had a nice little hot plastic jam to fish out.
 
 
Here's a nice shot of my crinkled mess for you :)
 
 
After a little bit of damage control, I trimmed them up and there you have it! Super cute, inexpensive and candy free!
 
My initial plan was to punch a hole at the top of each bookmark and attach a ribbon. I was advised by my 7 year old that ribbons would make it too girly for his friends that are boys. We both agreed they were good like this.
 
 
I would love to hear some other candy free favor ideas. I'm still on the search for a preschool age appropriate handout. I would love some help!
 
Have a great day!
-Lisa

Wednesday, October 17

Pumpkin Pie French Toast - Recipe

 
I love all things pumpkin. Especially this time of year, and I know I'm not alone. Our family has a slight addiction to these pumpkin scones, and I'm always left with unused pumpkin. Last year I found I could make pumpkin butter with the exact amount left in the can. That was great, but we can only eat so much pumpkin butter. I wanted another option. And so, our Pumpkin Pie French Toast was born!
 
This is sooo good! The best part, in my opinion, is that my kids gobble this up and there is no added sugar. So you can opt to leave off the maple syrup and know that it's a wholesome breakfast (or in our case dinner) with lots of healthy vitamins.


Pumpkin Pie French Toast
 
1 Cup pure pumpkin puree
6 eggs
1/3 C milk
1/4 tsp nutmeg
1/4 tsp ground ginger
dash of ground cloves
 
Bread
 
 
1) Whisk together eggs and milk.
 
2) Add pumpkin and whisk until smooth. Add nutmeg, ginger and cloves and mix well. The mixture should be thick and have an almost custard like appearance.


3) Dip your bread slices in the mixture, making sure to coat both sides.
 
4) Cook on a griddle or frying pan on medium heat until both sides are lightly browned.


Tuesday, October 16

Easy Halloween Decor for the Front Door


Up until a few months ago, I had never been a huge decorating fan. Of anything really, the house, holidays, birthdays. I have always opted for the "less is more" mentality. I still follow that mantra, but I have been finding myself really enjoying adding a few touches here and there. It seems like just changing up one or two things in an area can really do a lot to transform the look and feel of the space.
 
This is still new to me, so I have been focusing a lot of my attention on the first impression spot of the house - in other words, the front door and entryway.


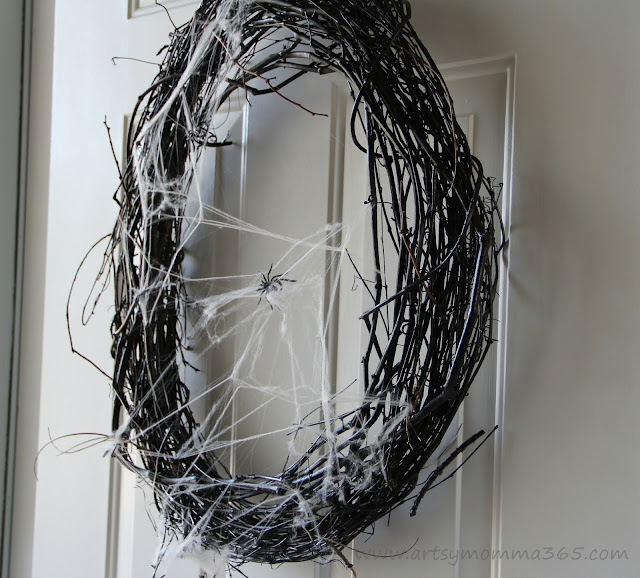
I started with a Halloween wreath I made last year. I found a base wreath on clearance for a few dollars and spray painted it black using what was left from another project. I added a few non-painted twigs that were in our backyard for contrast and attached fake cobwebs and spider rings. Easy-peasy and cute to boot (couldn't help myself there, sorry!)


I covered our front entry table with gauzy Halloween material I found. That alone made a big impact. Then I dug around our itty-bitty Halloween decor stash (I think it consists of 8 things). I typically buy my holiday decor a year ahead, right after the holiday itself when items are at a deep discount. The only thing I had to buy on the table above was an emergency candle for $1.50 (looks the same as the nicer pillar candles if you ask me). I cut out a quick vinyl spider and web and attached those.


Last year, I remember seeing a lot of cut out bats that bloggers had attached to their walls or outside of their homes. Since I just so happen to have an awesome new die cutting machine, I jumped right on that band wagon and cut out a bunch of different sized bats.


The bats were attached using Zots (or snot dots as we used to call them in design school). If you decide to try this yourself, make sure to buy the removable Zots - most are permanent and I don't think it's worth having globs of adhesive all over your walls or siding, no matter how cute these little guys are. You can gently crease the wings to make them look like they are flying.
 
 I love these bats. I keep finding myself looking at our front door and smiling - because I'm a nerd like that.
 
Have a great day!
-Lisa

Monday, October 15

The Pumpkin Patch

 
We finally made it to the pumpkin patch this weekend. I wanted to share a few pictures from our afternoon. I hope you all had a wonderful weekend!
 
 
Our family is getting ready for Halloween, and I hope to share a few of our projects with you over the course of the week.
 
Wishing you a wonderful start to a beautiful week!
-Lisa