Pages

Thursday, December 29

Quick Craftiness


I thought I would pop in real quick and share the only crafty gift I gave this year. Somehow Christmas just snuck up on me and I didnt have time to make anything super involved. So, the photos you see above were placed in a black collage frame and as far as I can tell, were loved immediately. Then again, how do you not love ANY picture of your own grandkids? Right?

The process was simple enough and only took about 15 minutes total. I took three pieces of white cardstock and wrote our message on them with a black sharpie marker. Then I marked the spot on the floor where I needed the kids to be and where I needed to be, because I knew no one would stay in one place. For the younger two, I propped the cardstock up on a toy car (anything large enough to hold it up will work - that just happened to be next to me at the time).

A few camera snaps later, and a quick change to grainy monochrome done in the camera itself, and we were done!

What crafts did you manage to have time for this year? Please share!
-Lisa

Wednesday, December 28

Holiday Aftermath

Tradition is a big thing for me. The very first Christmas we celebrated as parents, we started discussing what we wanted to do each year as a family. Though a lot of our ideas only last one year, even with the best of intentions, a few have stuck around. As we're winding down over here, from all the hustle and bustle, I thought I would share a little bit of our solid traditions with you all. I hope everyone is having a wonderful holiday.


On Christmas eve, after we've baked Santa's treats and planned out the holiday movie, we eat Chinese and then go for a drive to see all the lights on the houses. This year we found an amazing display of at least fifty lighted reindeer, frolicking over what looked to be about 10-15 acres of land. They were in the trees, drinking water from a stream, on both sides of the road, and a small group had gathered around Rudolf. It was beautiful.


When we get home, the kids write letters to Mr & Mrs. St. Nick, set out their treats and then settle down for a Christmas movie. We always watch the clay-mation Rudolf, the one from years ago, that even I watched as a child and loved.


After being sent back to bed about 4 to 5 times and told not to come back until the sun was up, the kids finally got to check out their gifts.


Even Stella got excited! This was her first.


I love this, thanks again Nana :)

Someone decided he would make a good ornament. Hannah....


Every year we make pizelles, a tradition inspired from my Grandma Sacchetti.


And of course, it wouldn't be Christmas without this peppermint bark.


How do you celebrate?


Happy Holidays from our family to yours!


-Lisa


Wednesday, December 21

Checking In & Giveaway Winner

I wanted to take a few minutes to check in with all of you. I hope everyone is enjoying this Holiday season. If you're anything like me, you're still scrambling right now to tie up loose ends. I'm going to take a short little break from blogging and I'll be back the beginning of next week. But for now, I want to share a snippet of what we've got going on...


We made peppermint scented glitter play dough for everyone in Hannah's class.


I, once again, attempted to create my own Christmas card photo of the kids. You would think I would know better by now...


A mischievous little Elf named Fred has been pleasantly surprising our family every morning.


And for fun, I'm going to share a few of the 30-40 (yeah, that's right, that many) blooper shots we had :)


Oh! And congrats to Gayle9015! The winner of the MyMemories Software giveaway. I will be contacting you later today with your prize.


Happy Holidays!

-Lisa


Thursday, December 15

My Memories Digital Scrapbooking Giveaway!!


Welcome back everyone! Today I have an incredible giveaway that I'm so excited to share with all of you. It's called My Memories and is a digital scrapbooking software program. This company has been so generous and not only gave me the software for free to review, but they also have given me the opportunity to offer it for free to one of you as well! More on that in a minute. Let's start with the program itself.

As some of you probably already know, I have a degree in Visual Communications (a.k.a. Graphic Design). I have created my own layouts similar to scrapbook pages in the past, so I was curious to see what this program had to offer. Mind you, all the programs I have been trained in cost upward of $1,200 - yup, that's right, a whole heck of a lot of moolah. So as a starting point, this program costs a considerable amount less.


Here's some info straight from their website

"Introducing MyMemories Suite 3 - the #1-rated scrapbooking software, just got better... again.

*Create in minutes

*Fast, and easy to use. Simple enough for beginners, yet powerful enough for a serious scrapbooker.

*Make it Easy
*Setup and cleanup are as easy as the exit button. And the savings over traditional scrapbooks is huge!

*Speaks for itself
Video, music, and narration can bring all your memories to life.

Countless ways to share your creation with family and friends again and again—and again.
MyMemories Suite v3 software is a complete digital scrapbooking solution that provides a comprehensive powerful set of creative tools no other scrapbook software can offer. With its intuitive workspace and enhanced time-saving features, this application is perfect for a beginner to create a complete album in minutes, or to empower the design pro to build a scrapbook album masterpiece.

With over 1,500 papers, over 1,000 page elements, and over 30 album templates (including 10 new for v3), MyMemories Suite lets you hit the ground running with your very own scrapbook or photo album in a matter of minutes. It’s easy-to-use and affordable—and compatible with both Windows and Mac computers.

With My Memories Suite you simply don't look at a scrapbook-you experience it!"


I think the biggest sellers for me would be not only the amount of money you save doing this, but also how quickly I can put together a project.

With three small children, amount of time spent doing anything matters a lot. What would have taken me hours in Photoshop, Illustratior or InDesign (keep in mind these other programs do completely different things - I'm not suggesting this is a substitute for those), only took me minutes, literally.

Here a few examples of some things I created in the program.


**This took 10 minutes start to finish,
and will be used as labels for a project for my daughter's preschool**


**This was the first thing I toyed with when I opened the program.
Less than a minute, I swear**


**This was one of their pre-designed layouts that I manipulated into greeting
card inserts for our Christmas cards - 20 minutes**

I am so excited about this program and it's ease of use and endless possibilities!
I know I have only hit the tip of the iceberg when it comes to creating on this program. I am amazed at how easy it is to use, and I'm sure you will be too.

Now, on to the giveaway...


Here is your chance to win a free download of MyMemories Suite!

There are three ways to enter this contest, which also means, you can have your name entered up to three times!

1) Go to MyMemories Facebook page and "like" them.
Be sure to leave a comment saying you did.

2) Become a follower or email subscriber to my blog.
Be sure to leave a comment saying which you did. (If you
already are, just leave a comment saying so)


3) Leave a comment saying what you would like to create first when
you use this software.


**Please make sure I have access to an email address so I can contact you if you win**

For those of you who are email subscribers, in order to leave a comment, you must be on the actual webpage, and the comments link is at the bottom of this post.


Don't feel like waiting to see if you win? My Memories also provided me with a $10 off a software download coupon code for all of you! Simply enter STMMMS95366 at the check out. You can visit their website here.

This code will never expire, and you can feel free to pass it along to anyone you want.


Thank you to everyone at My Memories for such a generous gift!

The giveaway is open to all residents in the US and Canada. The giveaway will end on Tuesday at 1 PM central time, and the winner will be drawn randomly.
The winner will be announced on Wednesday.


Take care!


Lisa

Wednesday, December 14

Kids Clothing Organization - Budget Friendly

Last week, I mentioned that I was starting to try and get more organized. I have only made a handful of minor changes around the house. Those small changes, however, have made a huge impact in the ease of my day. So much so, that I want to make it a personal goal of mine to organize my entire house this year.


I am, and I hate to admit this, probably the most unorganized person I know. Seriously. I am much more of a creative, go-with-the-flow, eh - this works for now, kinda girl. That being said, if I can do it, so can you! I'm going to start a new thread on the blog specifically aimed towards organizing, so be sure to check back for more ideas and tips over the next few months.

Because organizing can seem so overwhelming to me, I tried to really narrow in on what I felt would make the biggest impact on my days. To do this, I wrote down everything I could think of that needing clearing, organizing, and sorting. After that, I highlighted 3 things that I felt would make the biggest impact - yup, just three. Wrote those on a separate sheet of paper and then tossed the old list. Why did I toss the other list? Because if I kept it, it would loom over me mentally, and I know I would get less done.

Fist on my list to tackle? The huge mass of clothing that had been acquired from my three children. We are done having babes. The three we have keep us quite busy. With one boy and two girls, I know that anything my son outgrows can be donated or handed over to a friend. With my girls however, that's a different story. I am lucky enough to have an awesome sister-in-law who gives us the most adorable clothing for Hannah. My niece is seven years older than her though, which means I needed to find a way to keep the clothing organized and stored. Also in a place where I won't forget about them. As my older daughter out-grows her clothing, it needs to be organized and stored for her little sister in the same manner.

So this is what I came up with....


I had no intention of spending money on anything for this, well, at least not much. So, with all the boxes coming in from the holidays lately, I came up with an idea. Wrap them! Yup, what you're looking at are diaper boxes (from years ago - we cloth dipe now), baby wipe boxes, shipping boxes, and so on. All wrapped up in plain brown shipping paper (you can find this for about $2.50 in the mailing area of big box stores, or at your local office supply store) to keep a uniform look. Then, I cut out matching squares of scrapbook paper, and placed a white shipping label (2x3") in the center to write the clothing size on. I made sure to tape the labels the same distance from the bottom of each box, again to help make it more uniform.

Now, all I have to do when I get clothing that doesn't fit either girl right away, is look for the box it needs to go in, pull it down and toss the clothing item in. That's it, I'm done, and I don't have to give it another thought. When my youngest outgrows a box of clothing, it can be donated or given away, and I can simply place a new white label over the one that is already there and use it for another set of clothing.


Since I had everything but the brown shipping paper, this project only set me back about $3.00. I'll take it!


Happy organizing!


Be sure to stop by tomorrow, I'm announcing the Giveaway, which has a $40 value!


Take care,


Lisa


Monday, December 12

Quick Frame Repurpose

I get bored easily, so I'm always looking for new ways to arrange areas in my house. I don't want to go out and spend money regularly doing this either. So, I browse pinterest for inspiration (feel free to follow me using the button at the top right of the page, and take a mental note of what we already have on hand.

That's how we ended up with this cute little tray. I love the tray idea, and like the look of it, however I'm not sold on it's placement just yet. I couldn't resist sharing this with you now though. It's so simple! Just take a decorative frame that you're not currently using, place a pretty piece of scrapbook paper in it, and remove the stand from the back.

Ta-dah! Instant pretty tray to corral little odds and ends around your house. And, because it takes a whole five minutes start to finish, if you don't like the look, just put the frame back where you found it.

I hope you all had a great weekend! Please be sure to check back this week, I will be hosting my very first Giveaway! I'm so excited about it, and can't wait to share!

Take care!
Lisa

Friday, December 9

Archive Friday - Alternative Wrapping

***This is a post from the archives, but I felt it was worth reposting. Have a great weekend!***


Did you know, that during the holiday season, in the US, "trash production increases by up to 25 percent, most coming from wrapping paper, boxes and shopping bags"? That statistic was taken from the Moscow Recycling Food Co-op Newsletter.

I vowed this year that our family would be different. But how? About a month or so ago, I started brainstorming different ways to wrap holiday gifts that would be both presentable yet earth friendly. I came up with a lot of ideas, but most of them were shut down by my husband (I have to give him credit, he pretty much lets me go all out on whatever I'm doing and never says a word - so because of that, I didn't protest too much). Some of the ideas he didn't want to go along with: wrapping them in fabric from my stash - um, ok, I get that. Wrapping them in old black and white newspaper and tied with pretty fabric ribbon - he thinks people will assume we're destitute, not to mention the mess it would likely make on our cream colored carpeting - ok, I'll give him that one too.


Sooo... I decided to make drawstring bags. Lots and lots of drawstring bags. So many, that I'm starting to wonder if they will last me till next year too. I used fabric from Granny Grace, so it's about as thrifty as you can get. I'm hoping that they will be re-used for some other purpose by the recipient. You can always find a use for a cute bag, right?

To see a tutorial on how to make drawstring bags, click here. I did mine a little different so they had a flat bottom. It's pretty much just smaller versions of the toy hammock tutorial on my blog.


How are you wrapping your gifts this year?


- Lisa

Thursday, December 8

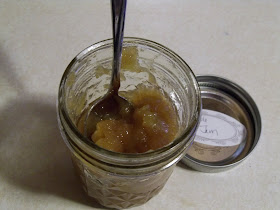
Easy Apple Jam - low sugar

I admit, I have been sharing an awful lot of jam/butter recipes. I just love making them. When I open up my freezer and see rows and rows of organized, colorful little jam jars, it makes me feel good - like I've accomplished something. Even more exciting for me? The fact that I have only had to purchase one jar of jam from the store this year - that's right, just one. We consume at least 2 eight ounce jars a week between the five of us, so that's an accomplishment in itself.


So here it is, my spin on apple jam (you can find the original recipe here). I reduced the sugar quite a bit to make it healthier, and I found the right ratio, so it tastes just as good as the fully loaded sugar variety. I have to say, this is one of the easier jam recipes that I've made. So if you've never made jam before, start here, with this recipe, it's no fail.


We use apple jam on pancakes, toast, and mixed in plain yogurt with walnuts. The yogurt tastes just like a dessert - again, minus the loads of sugar. Give it a try and let me know what you think.


Apple Jam
6 C diced apples (skin on) - 1/8" cubes

1/2 C water

1/2 tsp butter

1 pkg low sugar powdered pectin

1 C sugar (I used raw)

1 C packed brown sugar

1/2 tsp cinnamon

1/4 tsp nutmeg


1) In a large pot, combine the apples, water and butter. Cook over low heat, stirring regularly until apples are soft, and much of the liquid has been released from them. You'll be tempted to add more water, but don't.


2) Cook until it almost looks saucy, then add the pectin and bring to a boil.


3)Add sugars, cinnamon and nutmeg and bring to a boil again for 1 minute, stirring constantly.

4) After 1 minute, remove from heat, and ladle into hot 8oz mason jars.


I chose to freeze these, so I left an inch of empty space at the top of each jar to accommodate expansion.


This makes a great addition to gift baskets for the holidays, especially if you choose to can them.


Take care!

Lisa


Friday, December 2

Custom Granola Bars

Yup, you read that right, "Custom Granola Bars". That's the only name that really fits these, and I love them. We all love them. The possibilities are endless, and I bet your family will love them too. Give them a try, they really are pretty easy. Sorry there's not a picture yet, they disappear super fast around here.

Custom Granola Bars
4.5 C Old Fashioned Rolled Oats
1 C Whole wheat flour
1 tsp Baking Soda
1 tsp Vanilla
2/3 C Butter - softened
2/3 C Honey
2 C Add-Ins

Pre-heat the oven to 325 and lightly grease a 9x13 pan with butter.

Combine oats, flour, and baking soda and whisk until well mixed.

Cream together butter, honey and Vanilla with a mixer.

In a large bowl, with a fork, mix the oat mixture, the add-ins and the the butter mixture until you don't see any dry spots. This takes a little arm power and a few minutes, but dry spots will make your bars crumble, so this is important.

As far as what you use for add-in's, the sky is the limit, as long as they're dry. We've done dried blueberries with raw sunflower kernels and chocolate ships. We've done just raisins. Coconut flakes with dried pineapple and macadamia nuts is amazing.

Press the mixture into the 9 x 13 pan, making sure to firmly pat everything down. Bake for 18-22 minutes or until the edges are lightly golden. Let the pan cool on a wire rack for 10 minutes, then cut into square or bar shapes. I've had the most luck with squares. Make sure to slice slowly, the mixture will still try to pull apart at this point. Once cut, let the bars cool completely to room temperature before removing them. Once cooled, they should hold their shape and stay solid, just like the store bought versions.

What's your favorite granola bar mix?

Thursday, December 1

December!

I can't believe it's December already! Or, for that matter, that I haven't blogged since October - yikes! I hope you all had a wonderful and stress-free Thanksgiving. Oh, and Halloween too! We have been happily going about our family routines over here. I have been honing my organizational skills in an attempt to free up more time - and I have lots of fun little tidbits to share - but more on that another day.


I wanted to share a quick recap of the last month, and go back to some regular blogging tomorrow.


We (um, I) got a little spray paint happy and went to town on lots of neat little projects. Including a chalkboard paint covered pumpkin for my little artist.


I felt that my "summer" pillow covers had finally over-stayed their welcome, and whipped up a few new ones. Our dog just loves them - the little stinker.


We devised our own little ketchup recipe for our homemade fries (a.k.a. potato wedges)


A little someone figured out how to smile and hasn't stopped since.


I managed to sneak this shot of sibling love that I know I probably won't see again for a LONG time.


Back to bread making...


Being reminded how cute baby babbling is, especially when it's directed toward Christmas trees.


Fulfilling our Legoland promise a few months late.

I hope you are all enjoying this Holiday season!


I'll be back tomorrow with a fun little recipe that's a huge hit in our house.


Take care,
Lisa