Pages

Sunday, February 28

Easy Wall Art


Welcome Back!
This was a fun project for my son. He's fascinated with reptiles, so we flipped threw some National Geographic magazines (super old ones, lol), and tore out the pictures he liked best.
The frames were in packs of two from the dollar store, and were unfinished.
What you need:
Photos or Magazine pictures cut to the size needed to fit the frame
Lightweight unfinished frames
Acrylic Paint
Paint brushes
1) Paint your frames in the desired color (Austin's room is based around the primary colors, so we plan on hanging these on the blue wall to follow the theme). Gather your photos or cut out the magazine pictures while the frames dry.
2) Insert the photos and you're done!
I hope you enjoyed this one!
Come back soon for more projects for you and your children.
Take care,
Lisa :)

Saturday, February 27

Sensory "Table"

Welcome Back!


Or maybe I should say "I'm Back!!"


I've been very distracted over the last few weeks, and have jumped into a bunch of projects (I'll post more on that later ;)


So I'd like to jump right back into this one. I will be doing my best to post at least 2-3 new projects each week. I actually started a new blog that focuses on simplifying, gaining health, and living in more sustainable lifestyle. If you'd like to take a peek click here.


Now onto the project....


What you need:

Large plastic storage container w/lid (I used an under the bed version that I already had)

3-4 large bags of uncooked rice (I found these for $1 a piece at the supermarket)

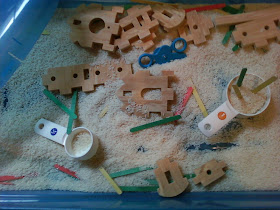
Any extra kitchen "tools" and toys you have - we used measuring cups, Popsicle sticks, funnels, foam pieces and old die-cast trains.


1) Empty all of the bags of uncooked rice into the storage bin and add your "tools" and toys - that's it!


My children will spend a good 30-40 minutes playing in the rice. They pour it from funnels and cups, and make birthday cakes with measuring cups and Popsicle sticks. They like making designs in the rice with their fingers and pushing the die cast cars and trains around in it. I have to stay close by my little one to make sure she doesn't throw the rice all over the place.


Make sure that you close up the rice to avoid small pests.


Thanks for visiting my site and please come back soon! I will be adding a few projects each week.


Take care!

-Lisa :)

Tuesday, February 9

King Cake - Fat Tuesday

Hi Everyone!
We're making a king cake tonight to celebrate fat tuesday. Here's a super simple way to make this complicated cake.
Buy pre-made cinnamon roll dough with frosting. Take out all of the roll segments and shape them into snake like shapes then attach them together to form a circle. Bake according to directions on the package. While that's baking, separate 3 piles of sugar and place in small bowls. Use food coloring to dye the sugar (I used 3 drops per bowl with about 1/4 cup of sugar in each one - traditional colors are purple, green and yellow ( we didn't have yellow, lol). When the cake is done, frost then add the colored sugar in three segments. You can also include a trinket before baking (plastic baby, bean, and so on) - we won't because my children are still too little.
I'll post a pic tonight.
Happy baking!
Lisa

Saturday, February 6

Fuzzy Felt Spider


Welcome Back!

Everyone is finely feeling better in our house, thank goodness! We got back to our crafts this afternoon, but the last few days got me thinking. I'm changing the dynamics of this blog. I still intend to do a craft everyday with my children, but I won't be posting daily - it's just too much right now. I'm limiting my blogging to 2-3 days a week - so you'll still get plenty of crafty ideas :)

My son's 5th birthday is next weekend, and a friend of mine gave him a craft DVD that was completly geared toward his age - I love it! The DVD gives you a few different crafts to complete, and then goes on to tell a story involving the character's your child just created. Thank you Mar! This spider was one of the crafts in the video.

What you need:
2 Sheets of felt in different colors
4 pipe cleaners
Scissors
Fabric Glue
Tape

1) Cut out 1 large circle, 2 smaller ovals for the eyeballs, and 2 tiny circles for the pupils.

2) Glue together the eyeball pieces to create finished eye, and then glue those to the large circle to create your spider base.

3) Hold the 4 pipe cleaners together in your hand so that they are even, and then twist from the ceneter to secure them, you can also take one end and wrap it around the center and then pull it back over to line up the legs. About an inch and a half from each grouped end (4 ends in a group) hold your hand straight, and bend the legs down, then do the same to the tips of that section, but pull them up a bit. Repeat on the other side. Now it should look like cartoon spider legs with feet.

4) Attach the legs to the back of the spider face with tape, and then you're done!

That's it!

My son had a great time making his spider climb the walls of our house this afternoon.

Thanks for visiting, please come back often!
-Lisa

Thursday, February 4

Some Links

Welcome Back!

Everyone in our house is sick now, and none of us really want to do much, lol. If you're looking for some fun craft ideas for you and your children, here's a few links to some sites I enjoy. Hopefully we'll all be up and moving soon, and back on track with our projects.

Nick Jr. Games

Easy Child Crafts

Family Fun

Take care everyone!
-Lisa

Tuesday, February 2

Groundhog Day!

Welcome Back!

Well, both kids are still sick, and Austin had no desire to do much of anything today, so I went online to look for a cartoon groundhog for Hannah to scribble on. I found this, and it looks a lot like the one I did when I was little for the movie Groundhog's Day staring Bill Murray. It was filmed in the town we live in, and it's a huge deal over here, lol. Our little theater plays the movie for free the entire week, and people can take tours of the town's square where it was filmed and see the spot where Bill Murray tripped and fell into the street - seriously. So, that being said, I just couldn't let the day go by with out doing something festive :)

Please be sure to check back tomorrow - hopefully my little artist will be feeling better.
-Lisa

Monday, February 1

Make A Face


Welcome Back!

Austin is still a little under the weather, but he said he wanted to do a project, so we did this, and he had a great time. He thought making his own people, or aliens as he put it, was hilarious.

What you need:
Construstion paper for the base
Magazines
Scissors
Glue stick

1) Depending on your child's age, either cut out a bunch of body parts from the magazine, or have them do it.

2) Let your child glue the parts together however they want.

3) Talk about what you see in the finished image and what the new characters are doing.

That's it! This is so simple and inexpensive, and so far I'd have to say this was one of Austin's favorites.

Be sure to sign up for the daily emails so you don't miss a project.

Come back again soon!
-Lisa